Frequently Asked Questions (FAQ) on Pocket Option
Interface
Switching a Platform layout theme
Pocket Option trading website has 4 different color layouts: light, dark, dark green, and dark blue themes. To switch the Platform layout theme, locate the "Settings" menu by clicking on your avatar in the upper panel of the trading interface, and choose the most convenient theme.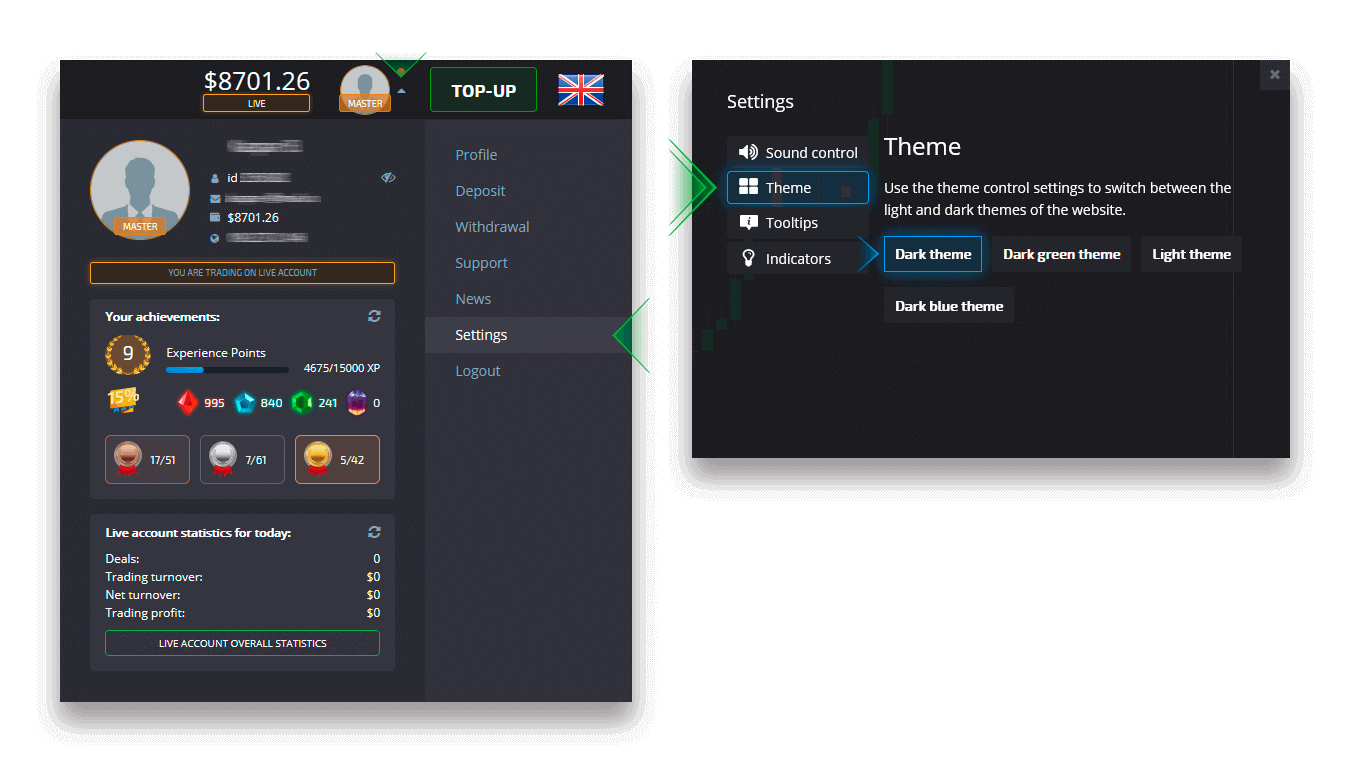
Multiple charts display
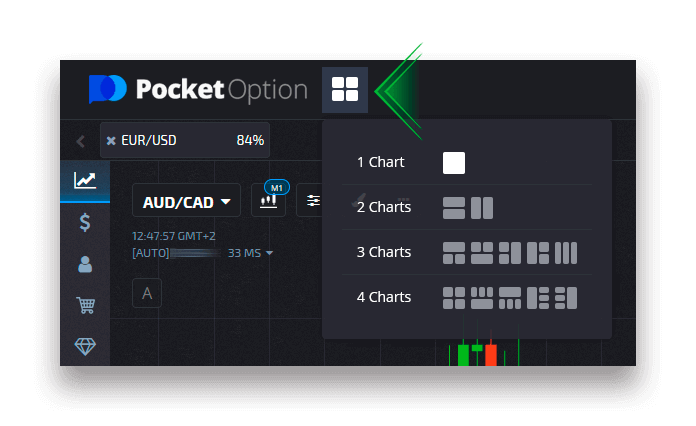
For simultaneous trading on several currency pairs, you can display from 2 to 4 charts for your convenience. Please pay attention to the button on the upper left of the screen next to the platform logo. Click on it and choose among several chart layouts.You can always switch to using several browser tabs if you prefer.
Trade panel position
The main trading panel is by default located at the bottom of the trading interface. You can adjust the position of the trade panel when you click on a small arrow sign in the upper left corner.
Hiding the trade panel while using multiple charts
When using the multichart mode, you can hide the trading panel, thus freeing up the working area of the screen entirely for the specified asset.To hide the trading panel, click on the button with the gamepad icon. The button only appears in multichart mode. To restore the trading panel to any of the areas, click on the gamepad button again (show trading panel).
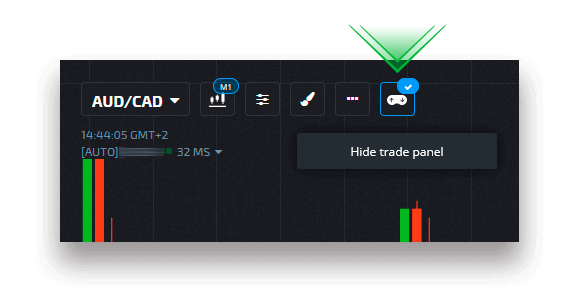
Chart type
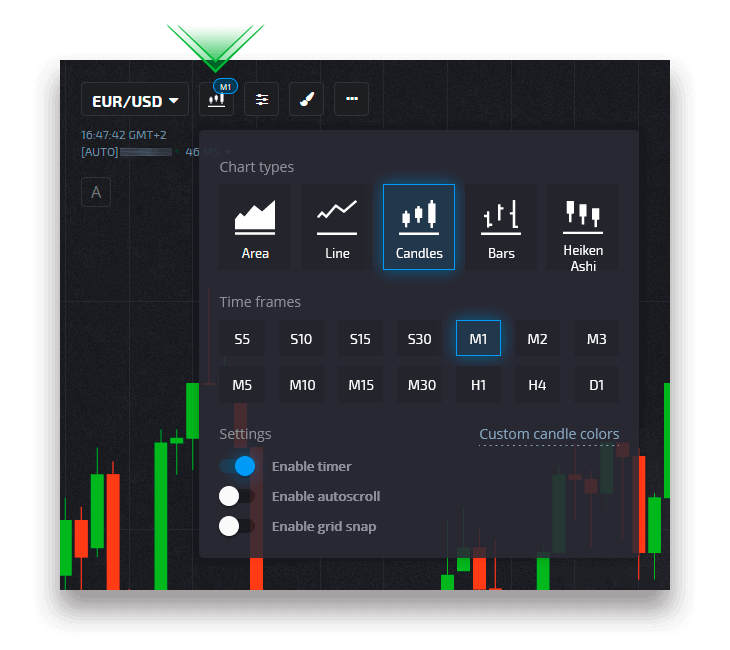
There are 5 chart types available on the platform: Area, Line, Japanese Candles, Bars, and Heiken Ashi.Area chart is a tick chart type that represents a fill area where you can see the price movement in real-time. Tick is the minimum change in price and there can be several ticks per second viewable with maximum zoom.
Line chart is similar to the area chart. It is also a tick chart showing the price movement in real-time but in a form of a line.
Candlestick chart indicates a high-to-low range of price movement in a specific timeframe. The body part of a candle shows the range between its opening and closing prices. Whereas, the thin line (candle shadow) represents the maximum and minimum price fluctuation within a candles lifetime. If the closing price is higher than the opening price, the candle will be colored green. If the closing price is lower than the opening price, the candle will be colored red.
Bars chart is similar to the candlestick chart as it also shows the opening price, the closing price, and the high-to-low range. The little horizontal line on the left indicates the opening price, the one on the right is the closing price.
Heiken Ashi chart is indistinguishable from the candlestick chart at first glance, but Heiken Ashi candles are generated according to a formula that allows to smoothen out the noise and price fluctuations.
Indicators
Indicators are mathematically generated tools of technical analysis that help traders predict the price movement and the prevailing market trend.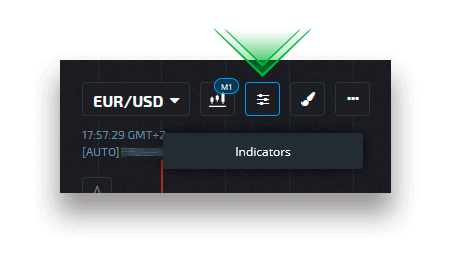
Drawings
Drawings are tools of technical analysis that look like lines and geometric shapes. They can be drawn on the chart or indicators. Drawings can be saved for each asset individually.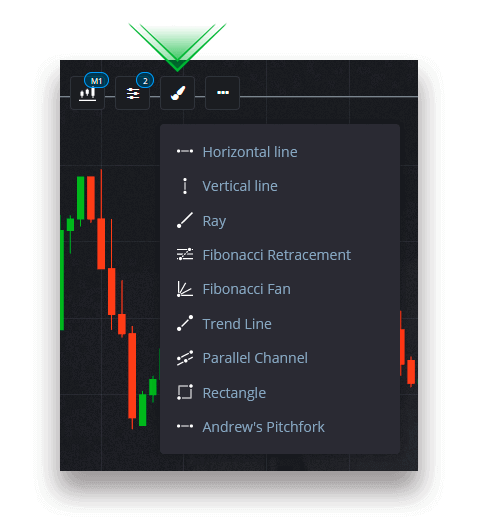
Hotkeys
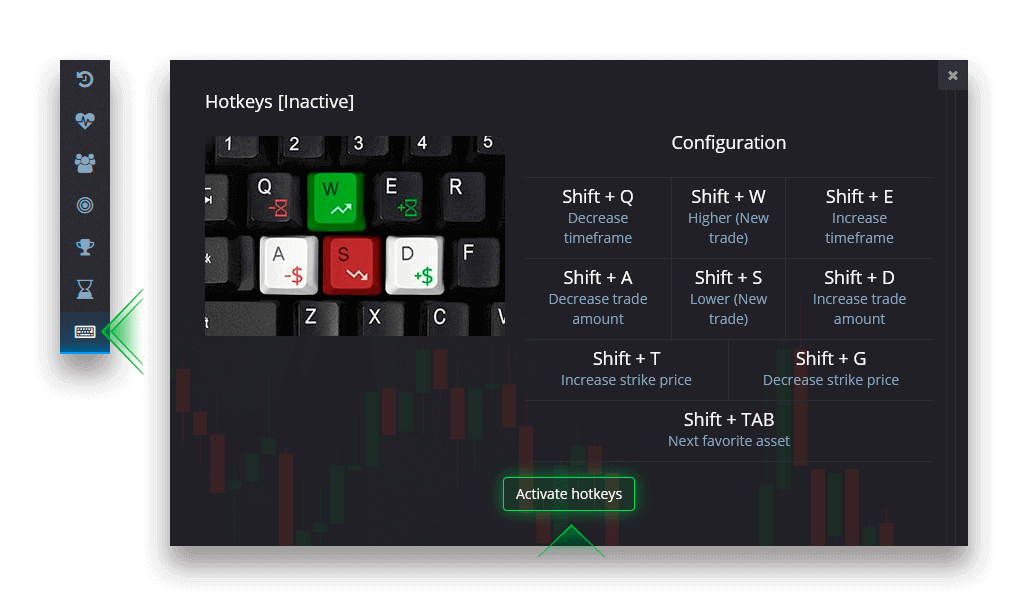
If you are an experienced trader and you want to save time when placing a trade (in CFD trading every pip and every minute counts), this section is designed specifically for this purpose.You can activate or deactivate hotkeys, learn the configuration (which task each key performs), and continue trading like a pro.
Demo Account
Can I get additional profit on the demo account?
A demo account is a tool for you to get familiar with the platform, practice your trading skills on different assets, and try out new mechanics on a real-time chart without risks.The funds on the demo account are not real. You can increase them by concluding successful trades, but you cannot withdraw them.
Once you’re ready to start trading with real funds, you can switch to a real account.
How to switch from a Demo to a Real account?
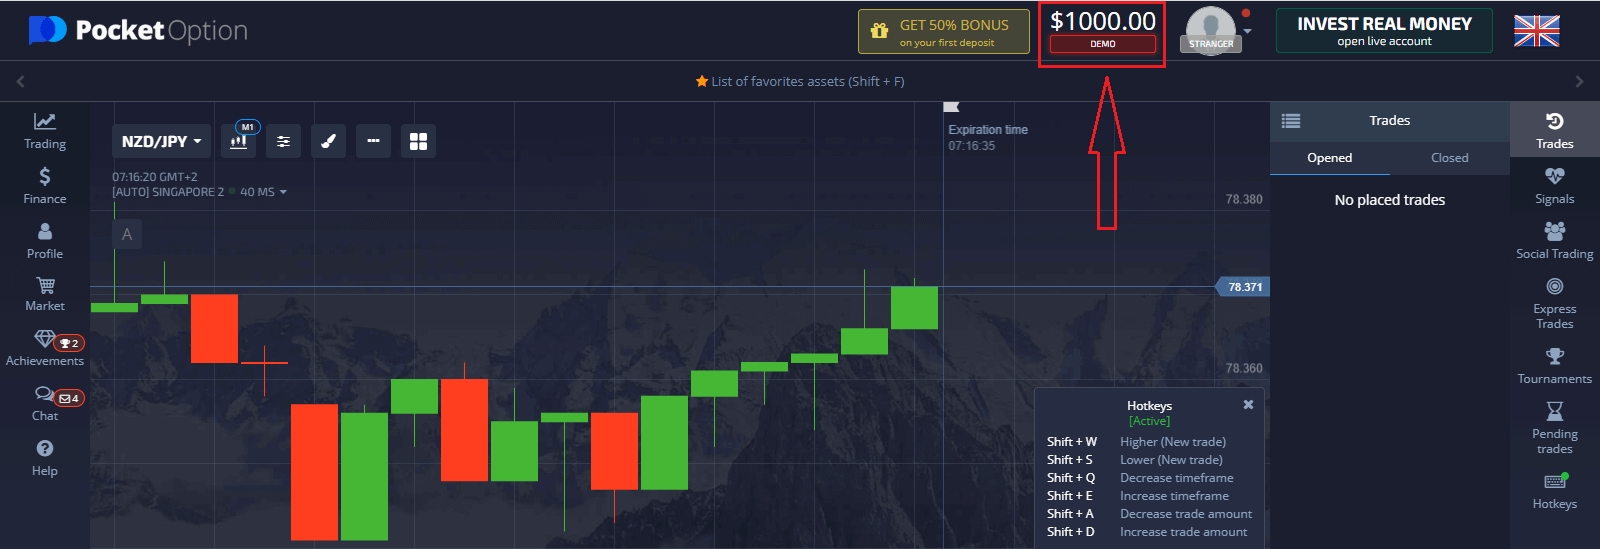
To switch between your accounts, follow these steps:1. Click on your Demo account in the top of the platform.
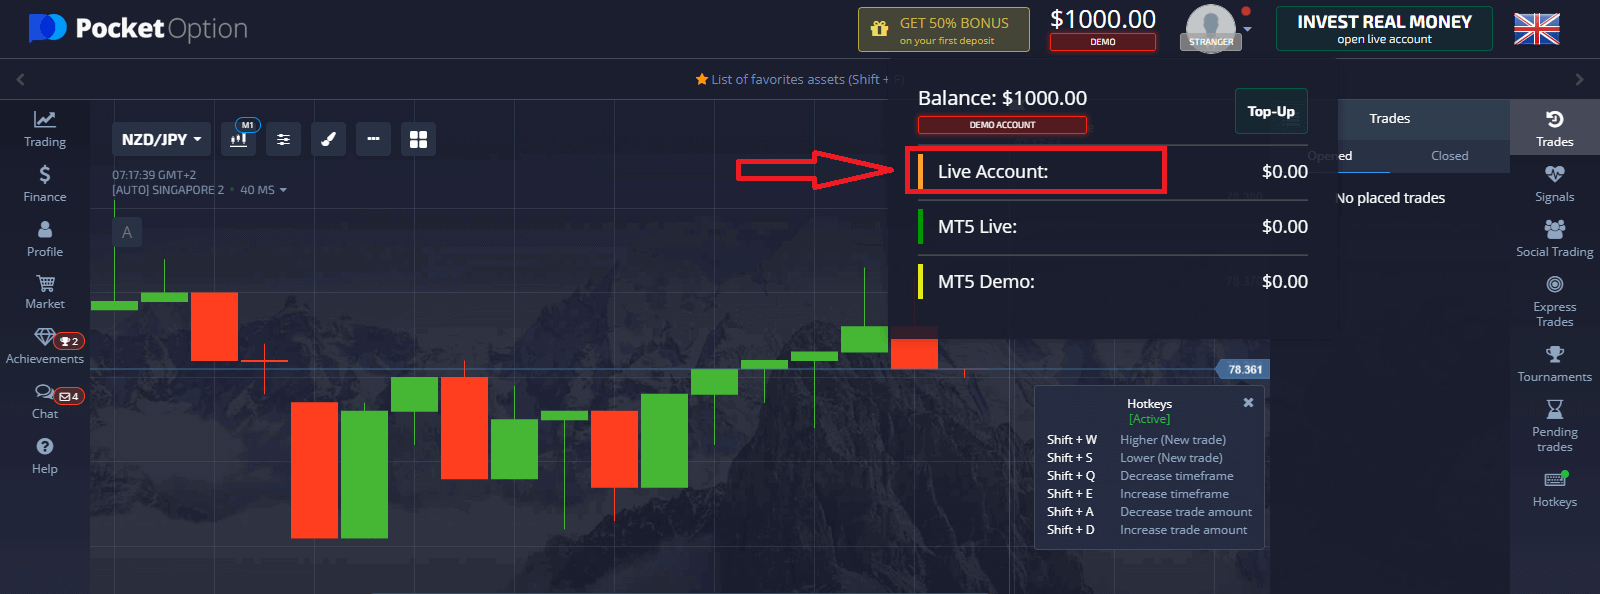
2. Click “Live Account”.
3. The platform will notify you that you have to make an investment in your account (Minimum investment amount is $5). Please first top up the balance to start Live Trading. Click “Deposit Now”.
After making a deposit successfully, you can trade with Real account.
Demo account top-up
In the upper menu, click on the demo balance and select the "Top-up" option to add any amount to your demo account.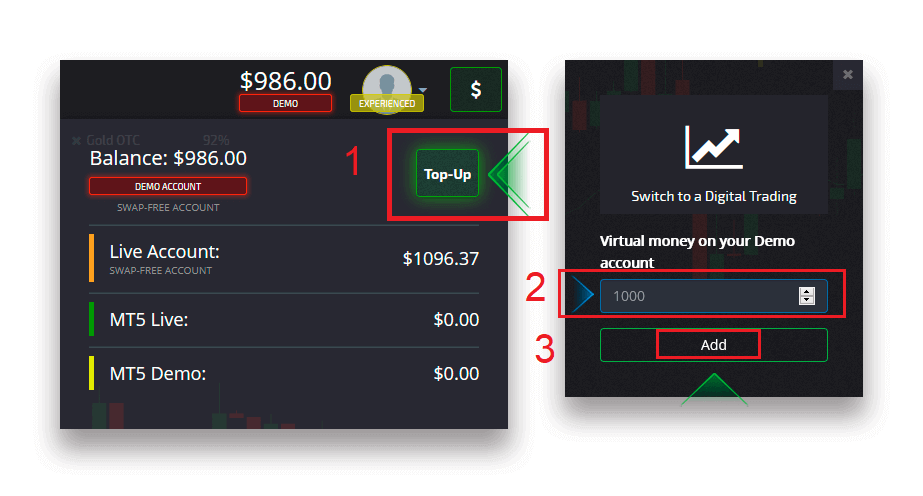
Verification
Verification of user data is a mandatory procedure in accordance with the requirements of the KYC policy (Know Your Customer) as well as international anti-money laundering rules (Anti Money Laundering).By providing brokerage services to our traders, we are obliged to identify users and monitor financial activity. The basic identification criteria in the system are verification of the identity, residential address of the client and email confirmation.
Email address verification
Once you’ve signed up, you will receive a confirmation email (a message from Pocket Option) which includes a link that you need to click to verify your email address.
If you haven’t received the email right away, open your Profile by clicking "Profile" and then click "PROFILE"
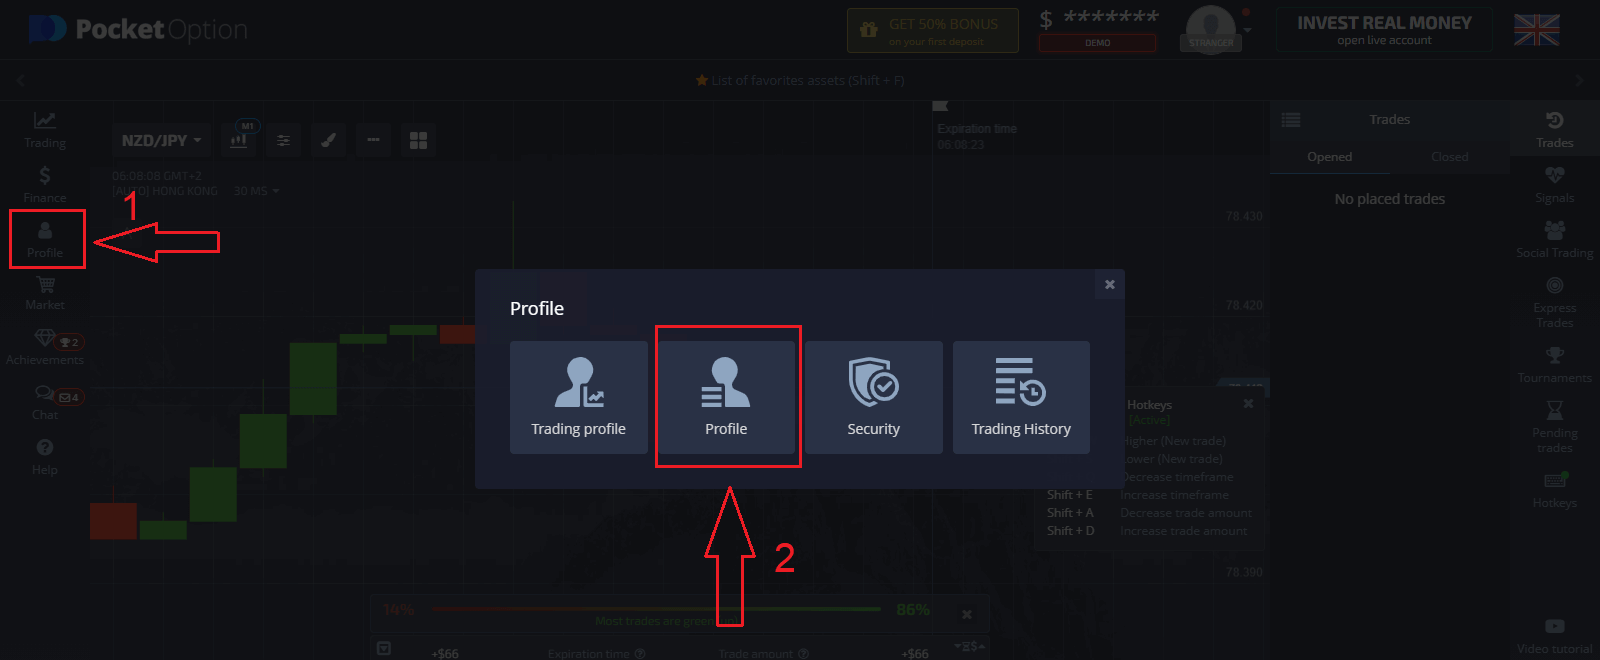
And in the “Identity info” block click on the “Resend” button to send another confirmation email.
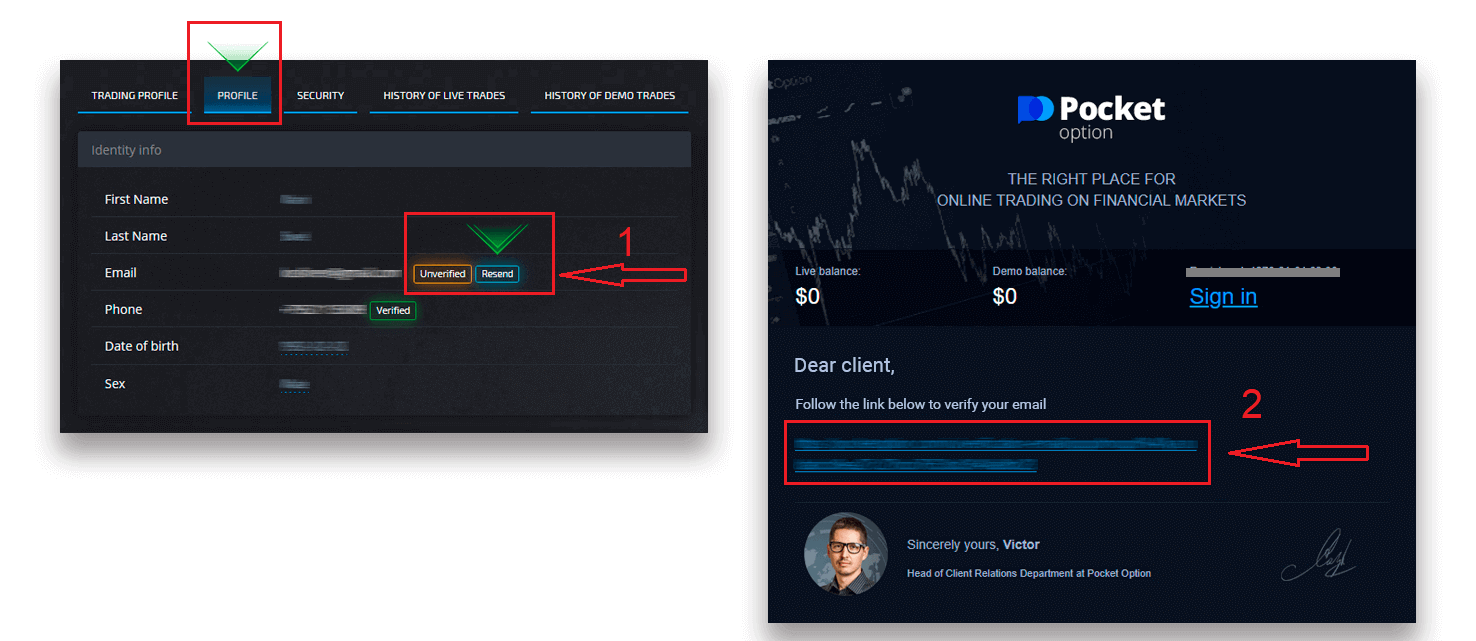
If you do not receive a confirmation email from us at all, send a message to [email protected] from your email address used on the platform and we will confirm your email manually.
Identity verification
The Verification process starts once you fill in Identity and Address information in your Profile and upload the required documents.
Open the Profile page and locate the Identity status and Address status sections.
Attention: Please note, you need to enter all the personal and address information in the Identity status and Address status sections prior to uploading documents.
For identity verification we accept a scan/photo image of the passport, local ID card (both sides), drivers license (both sides). Click or drop the images in the corresponding sections of your profile.

The document image must be colored, uncropped (all the edges of the document must be visible), and in high resolution (all information must be clearly visible).
Example:
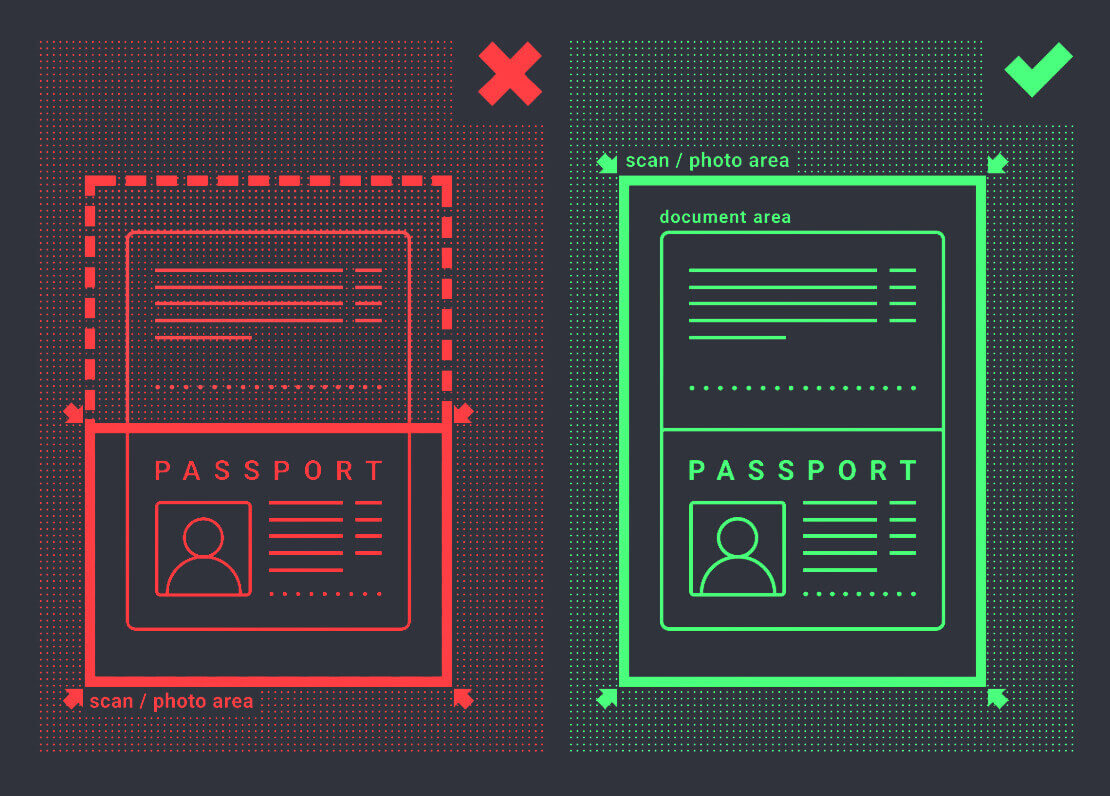
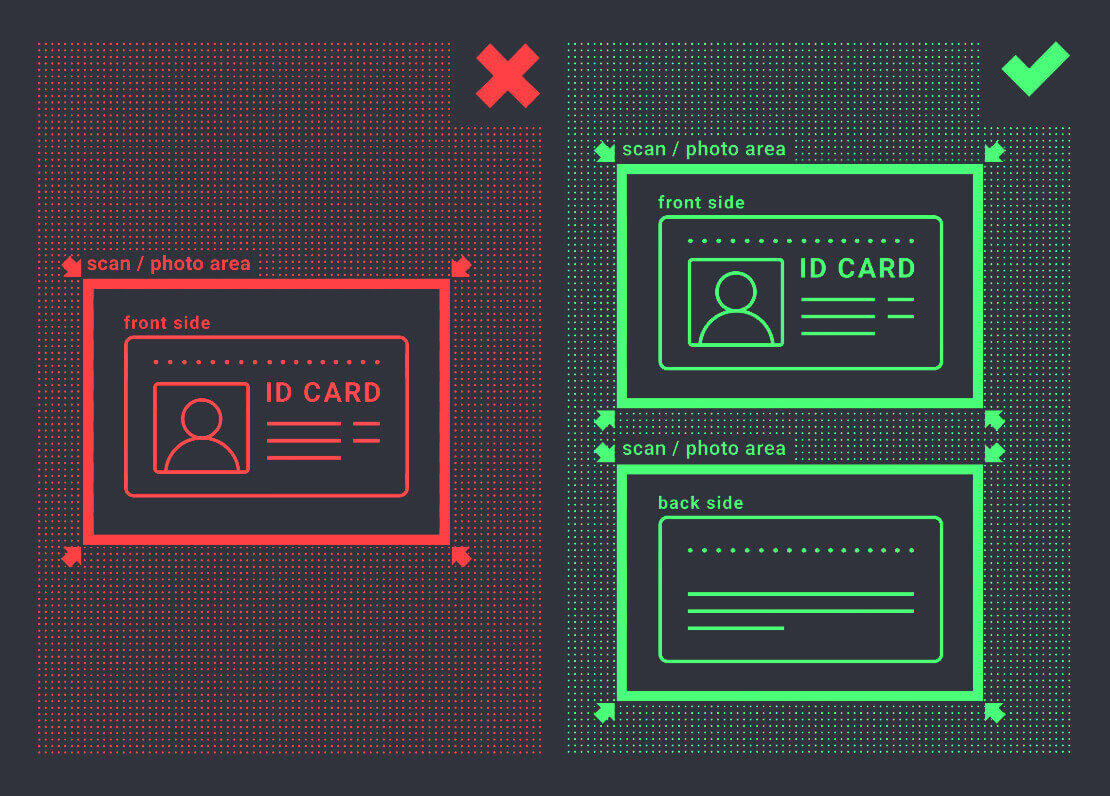
Verification request will be created once you upload the images. You can track the progress of your verification in the appropriate support ticket, where a specialist will reply.
Address verification
Verification process starts once you fill in Identity and Address information in your Profile and upload the required documents.
Open the Profile page and locate the Identity status and Address status sections.
Attention: Please note, you need to enter all the personal and address information in the Identity status and Address status sections prior to uploading documents.
All fields must be completed (except the “address line 2” which is optional). For address verification we accept paper-issued proof of address document issued in the account holder’s name and address not more than 3 months ago (utility bill, bank statement, address certificate). Click or drop the images in the corresponding sections of your profile.
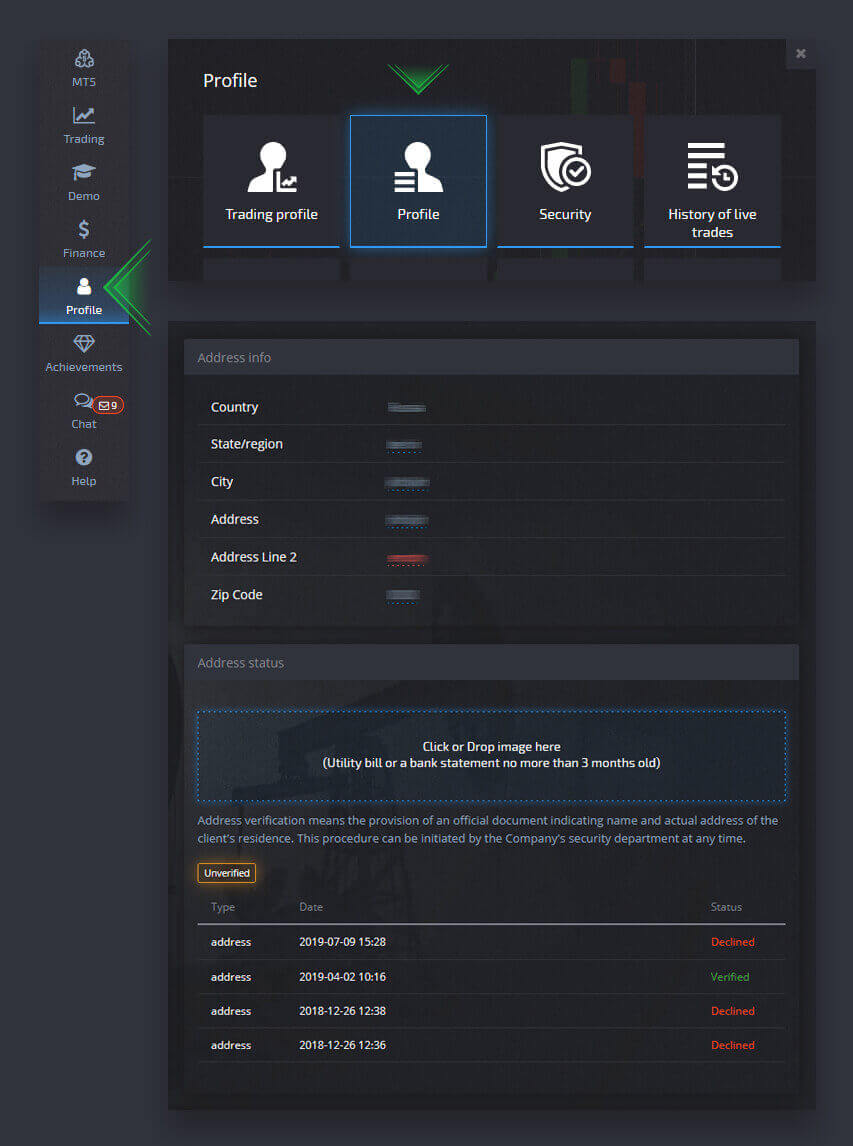
The document image must be color, high-resolution and uncropped (all the edges of the document are clearly visible and uncropped).
Example:
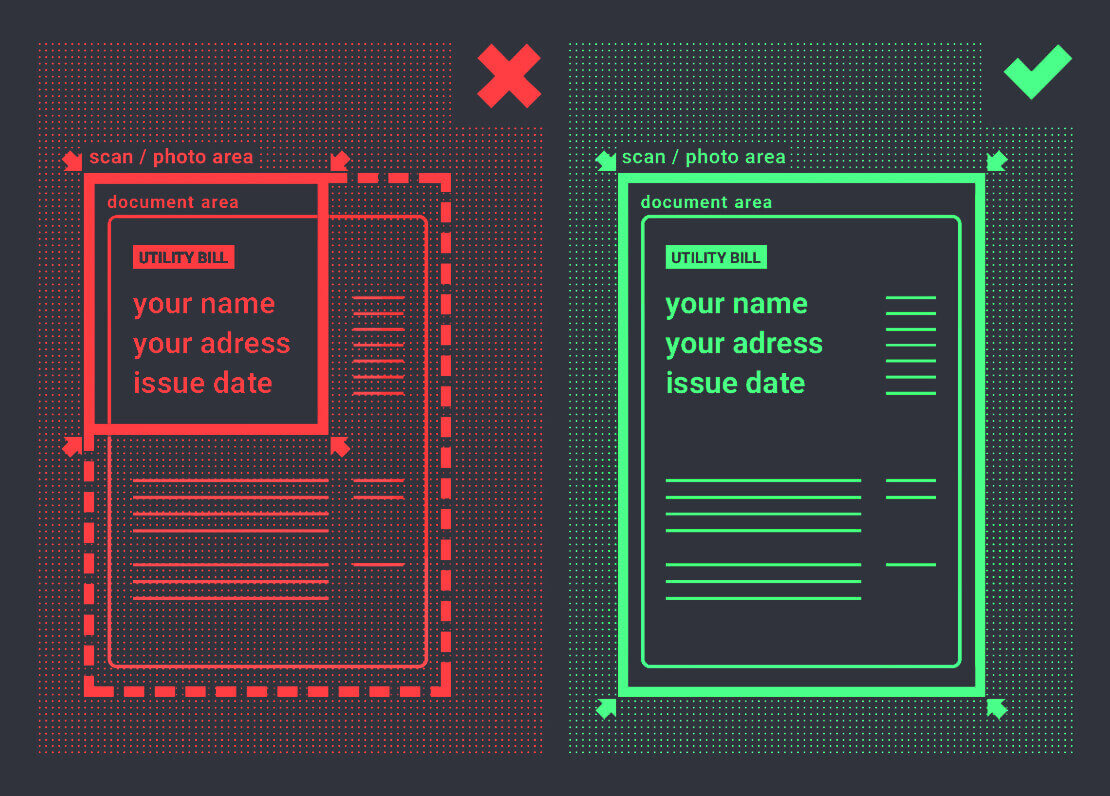
Verification request will be created once you upload the images. You can track the progress of your verification in the appropriate support ticket, where a specialist will reply.
Bank card verification
Card verification becomes available upon requesting a withdrawal with this method.
After the withdrawal request is created open the Profile page and locate the "Credit/Debit Card verification" section.
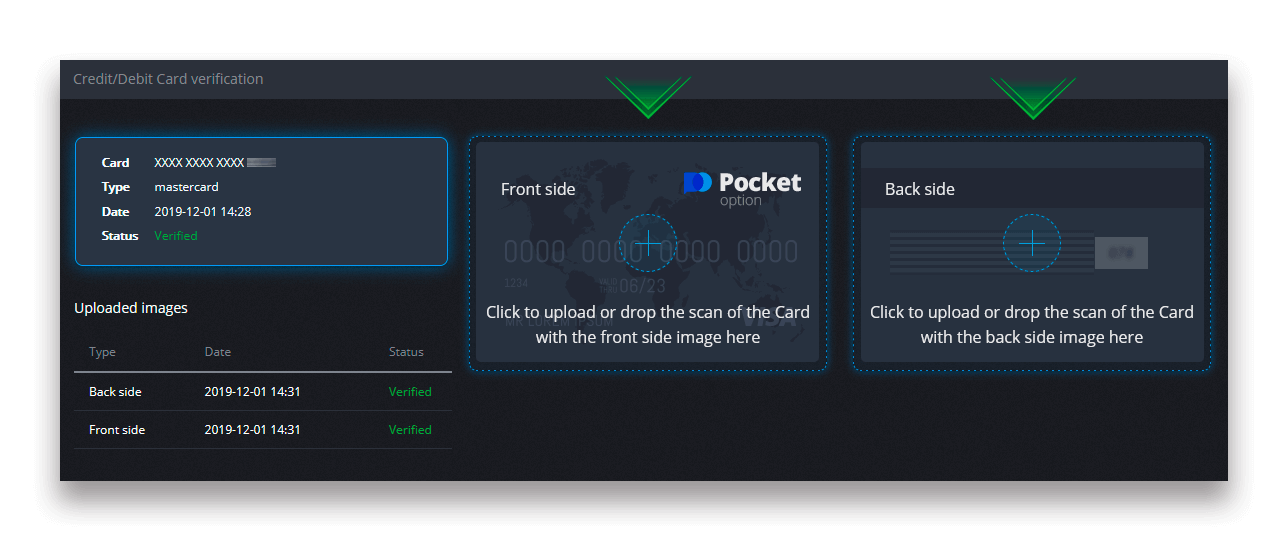
For bank card verification you need to upload scanned images (photos) of the front and back sides of your card to the corresponding sections of your Profile (Credit/Debit Card verification). On the front side, please cover all digits except the first and last 4 digits. On the back of the card, cover the CVV code and make sure the card is signed.
Example:
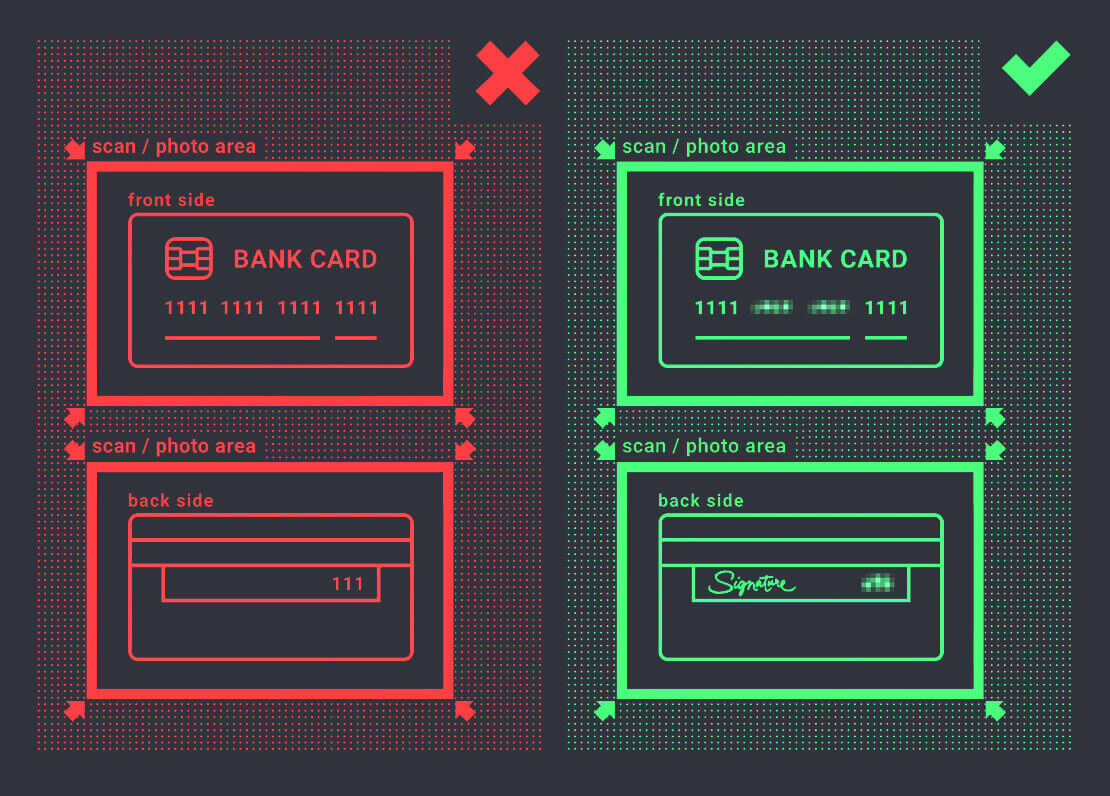
A verification request will be created after the process is initiated. You can use that request to track the verification progress or to contact our support team for help.
Deposit
To make a deposit, open the “Finance” section in the left panel and select the “Deposit” menu.
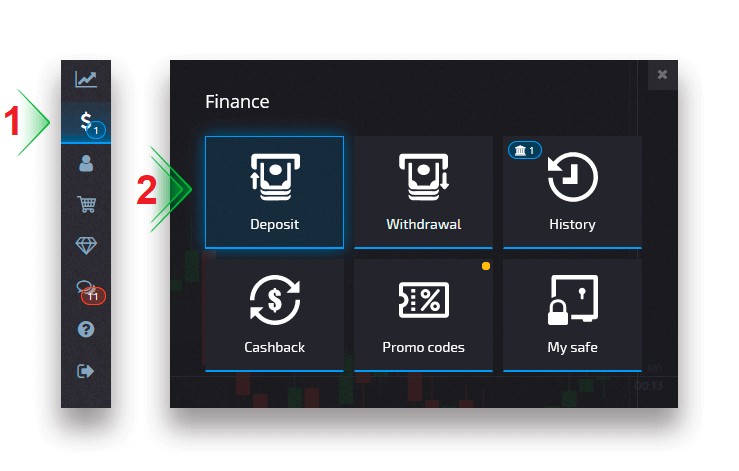
Choose a convenient payment method and follow the onscreen instructions to complete your payment. Please note that the minimum deposit amount varies depending on the chosen method as well as your region. Some payment methods require full account verification.
Your deposit amount can increase your profile level accordingly. Click on the "Сompare" button to view the additional features of a higher profile level.
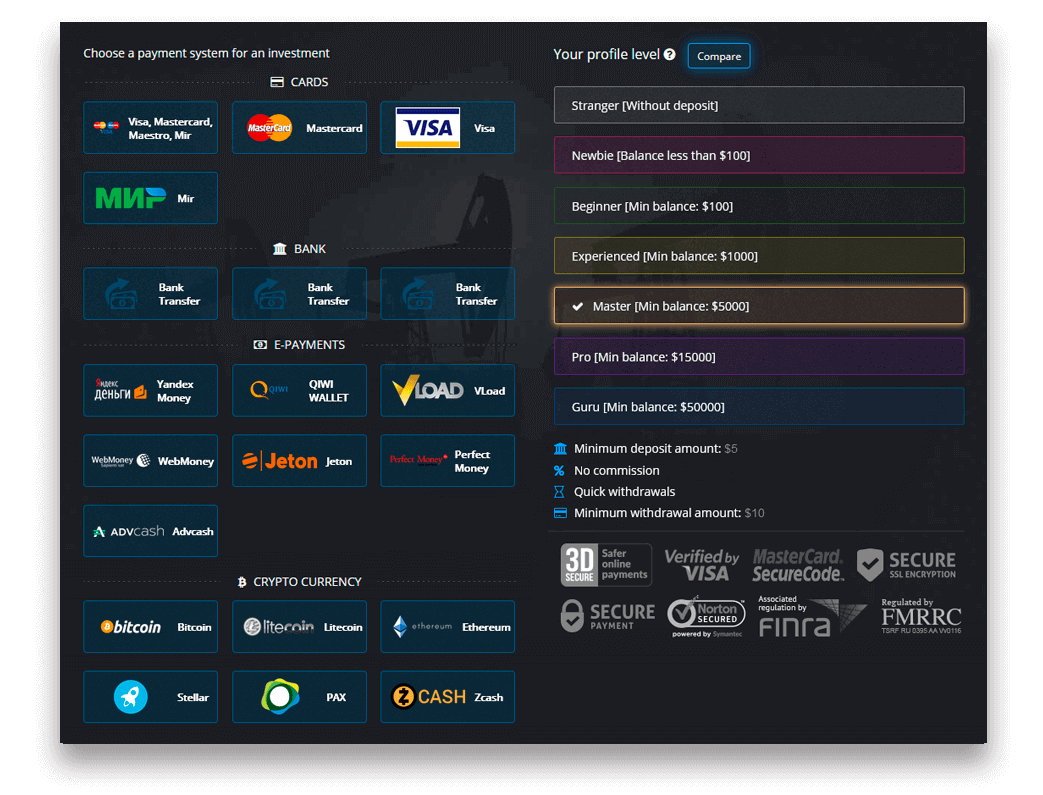
Attention:Please note that for security reasons withdrawal is available only via the same payment methods which were previously used for deposits.
Cryptocurrency deposit
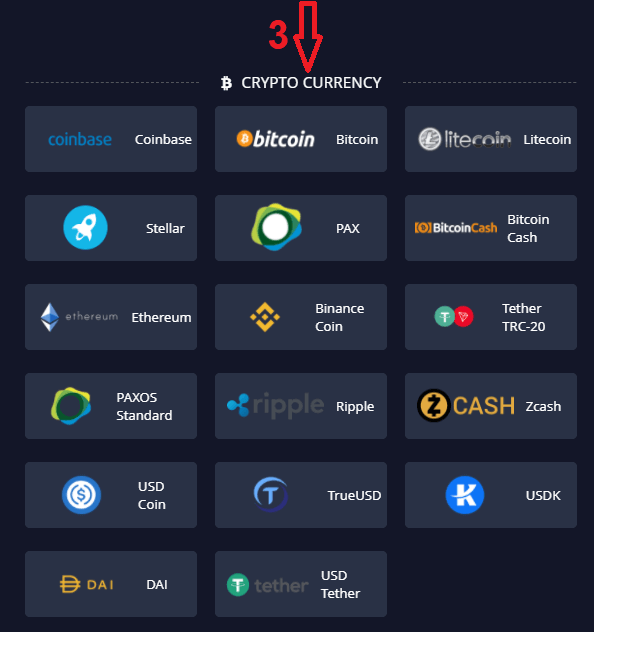
On the Finance - Deposit page, choose the desired cryptocurrency to proceed with your payment, and follow the onscreen instructions.Most payments are processed instantly. However, if you’re sending funds from a service, it may apply a fee or send a payment in several parts.
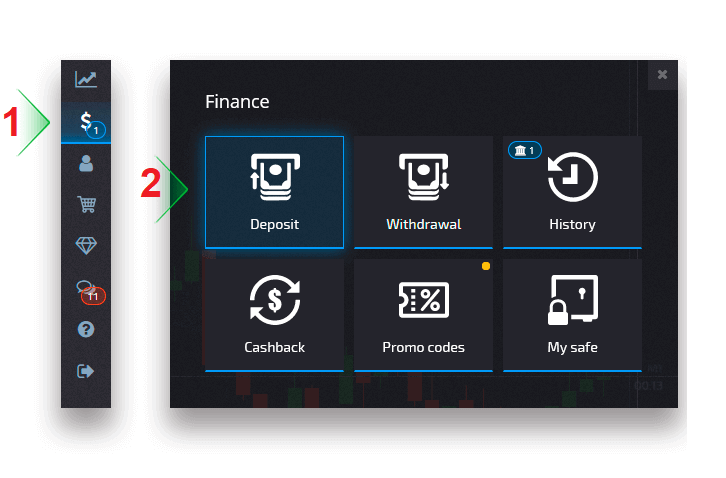
Choose the Crypto you want to deposit
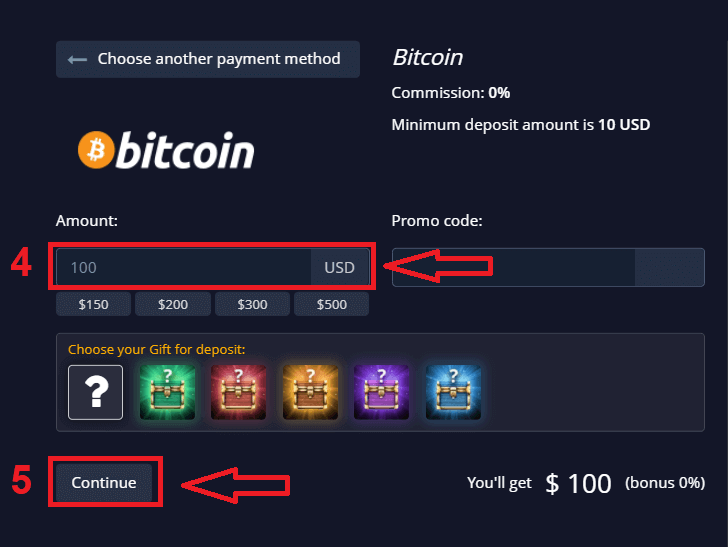
Enter the amount, choose your gift for deposit and click "Continue".
After clicking "Continue", you will see the address to deposit in Pocket Option
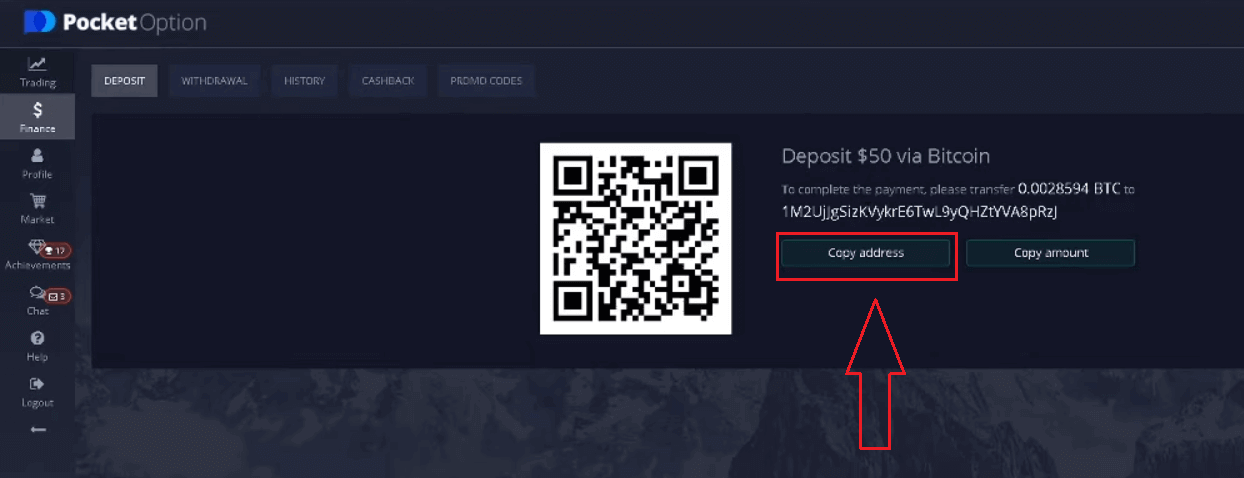
Go go History to check your latest Deposit
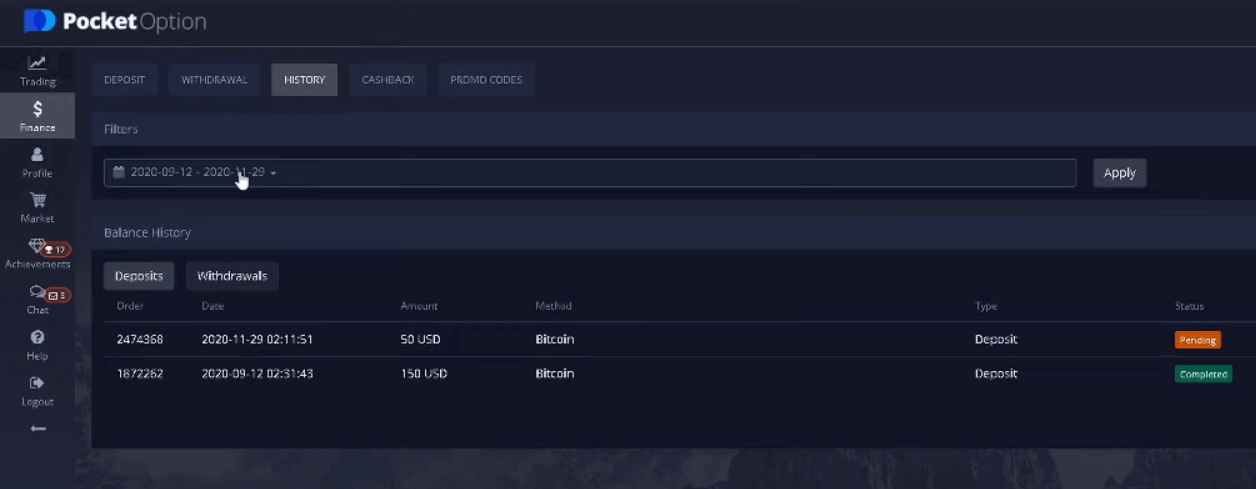
Attention: if your cryptocurrency deposit is not processed instantly, contact the Support service and provide the transaction ID hash in the text form or attach a url-link to your transfer in the block explorer.
Visa/Mastercard deposit
On the Finance - Deposit page, choose the Visa, Mastercard payment method.It may be available in several currencies depending on the region. However, the balance of your trading account will be funded in USD (currency conversion is applied).
Attention: For certain countries and regions the Visa/Mastercard deposit method requires a full account verification before usage. The minimum deposit amount also varies.
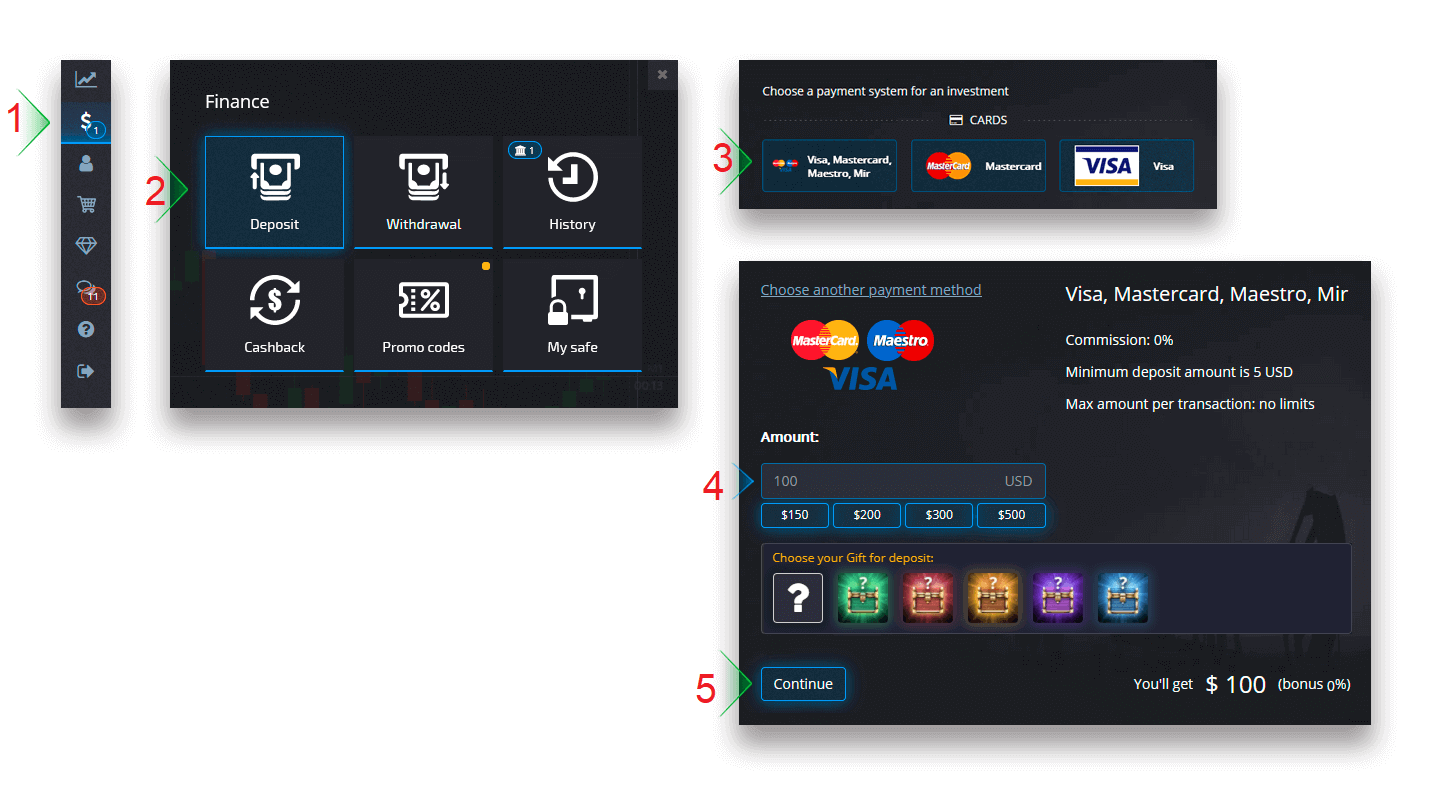
Once the payment is completed, it will take a few moments to appear on your trading account balance.
eWallet deposit
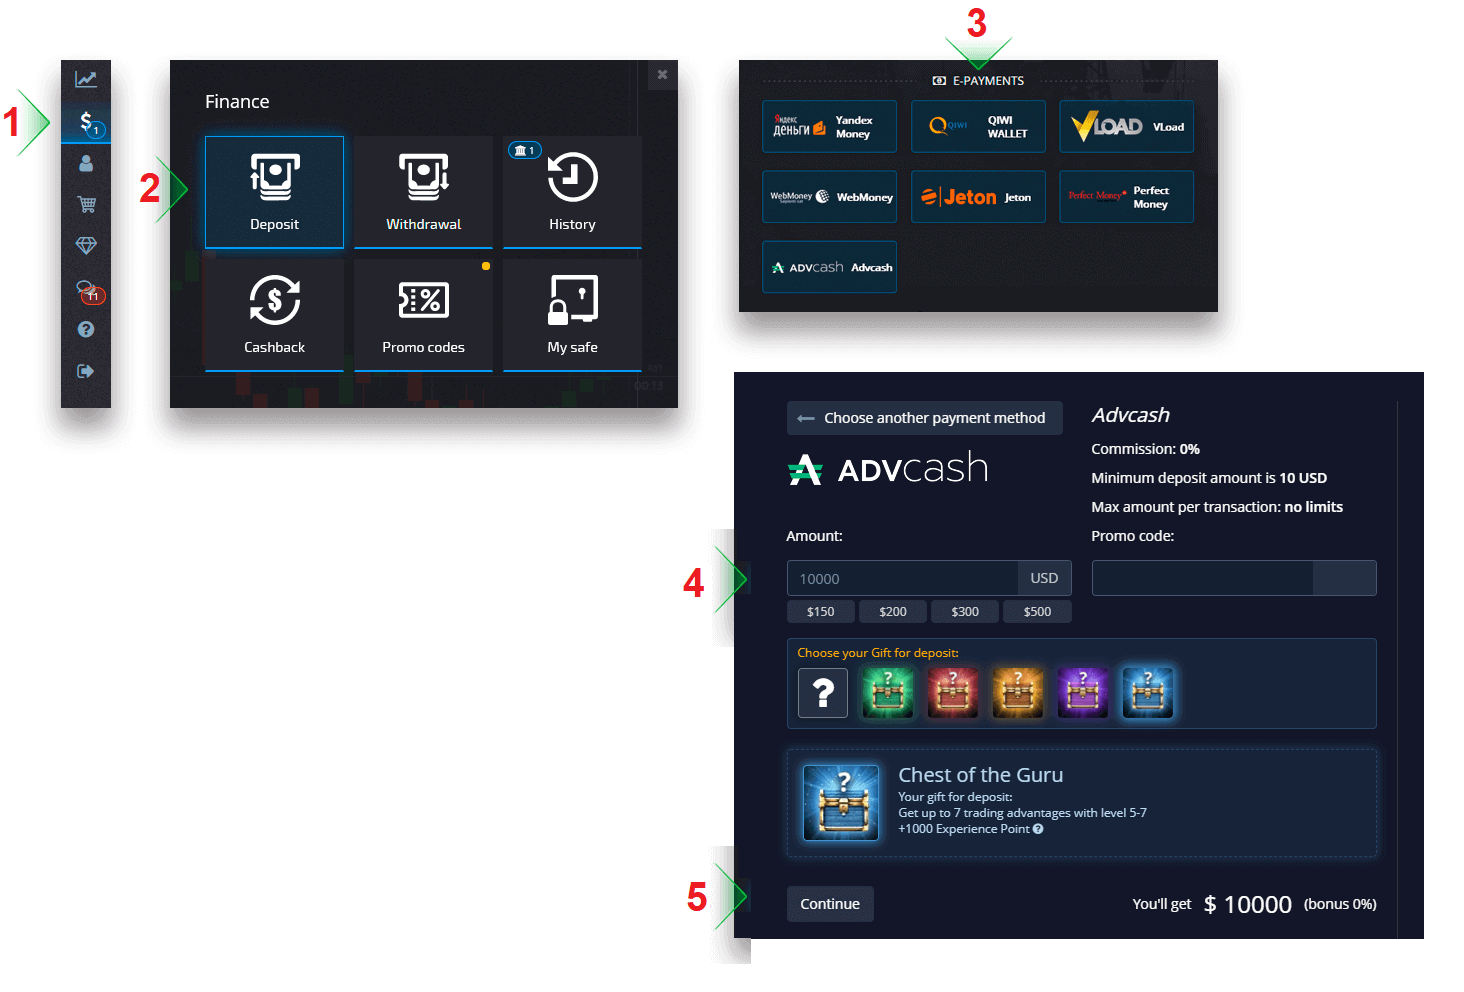
On the Finance — Deposit page, choose an eWallet to proceed with your payment.Follow the on-screen instructions to complete your payment. Most payments are processed instantly. Otherwise, you may have to specify the transaction ID in a support request.
Attention: For certain countries and regions, the eWallet deposit method requires full account verification. The minimum deposit amount also varies.
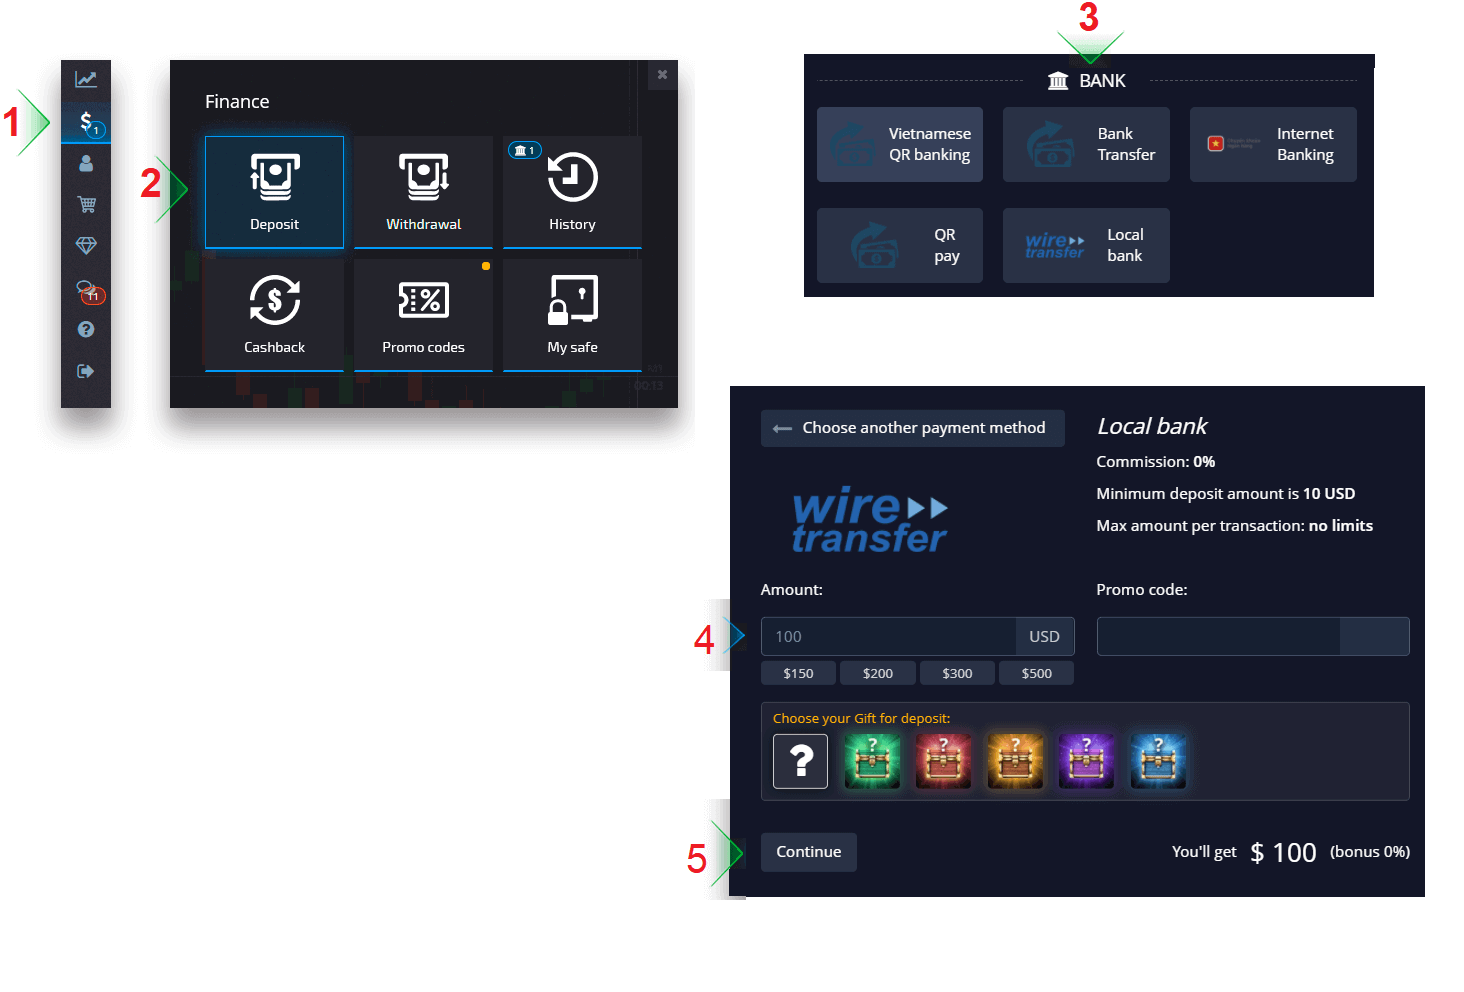
Wire transfer deposit
Bank transfers are represented in several payment methods, including local bank transfers, international, SEPA, etc.On the Finance - Deposit page, choose a wire transfer to proceed with your payment.
Enter the required bank information and on the next step, you will receive an invoice. Pay the invoice using your bank account to complete the deposit.
Attention: For certain countries and regions, the Bank Wire deposit method requires full account verification. The minimum deposit amount also varies.
Attention: It may take a few business days for the transfer to be received by our bank. Once the funds have been received, your account balance will be updated.
Deposit processing currency, time and applicable fees
The trading account on our platform is currently available only in USD. However, you can top-up your account in any currency, depending on the payment method. Funds will be converted automatically. We do not charge any deposit or currency conversion fees. However, the payment system that you use may apply certain fees.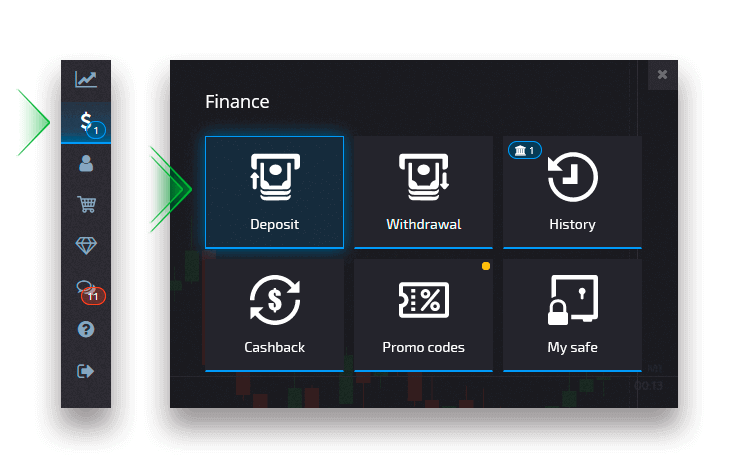
Applying a deposit bonus promo code
To apply a promo code and receive a deposit bonus, you have to paste it into the promo code box on the deposit page.The deposit bonus terms and conditions will appear on the screen.
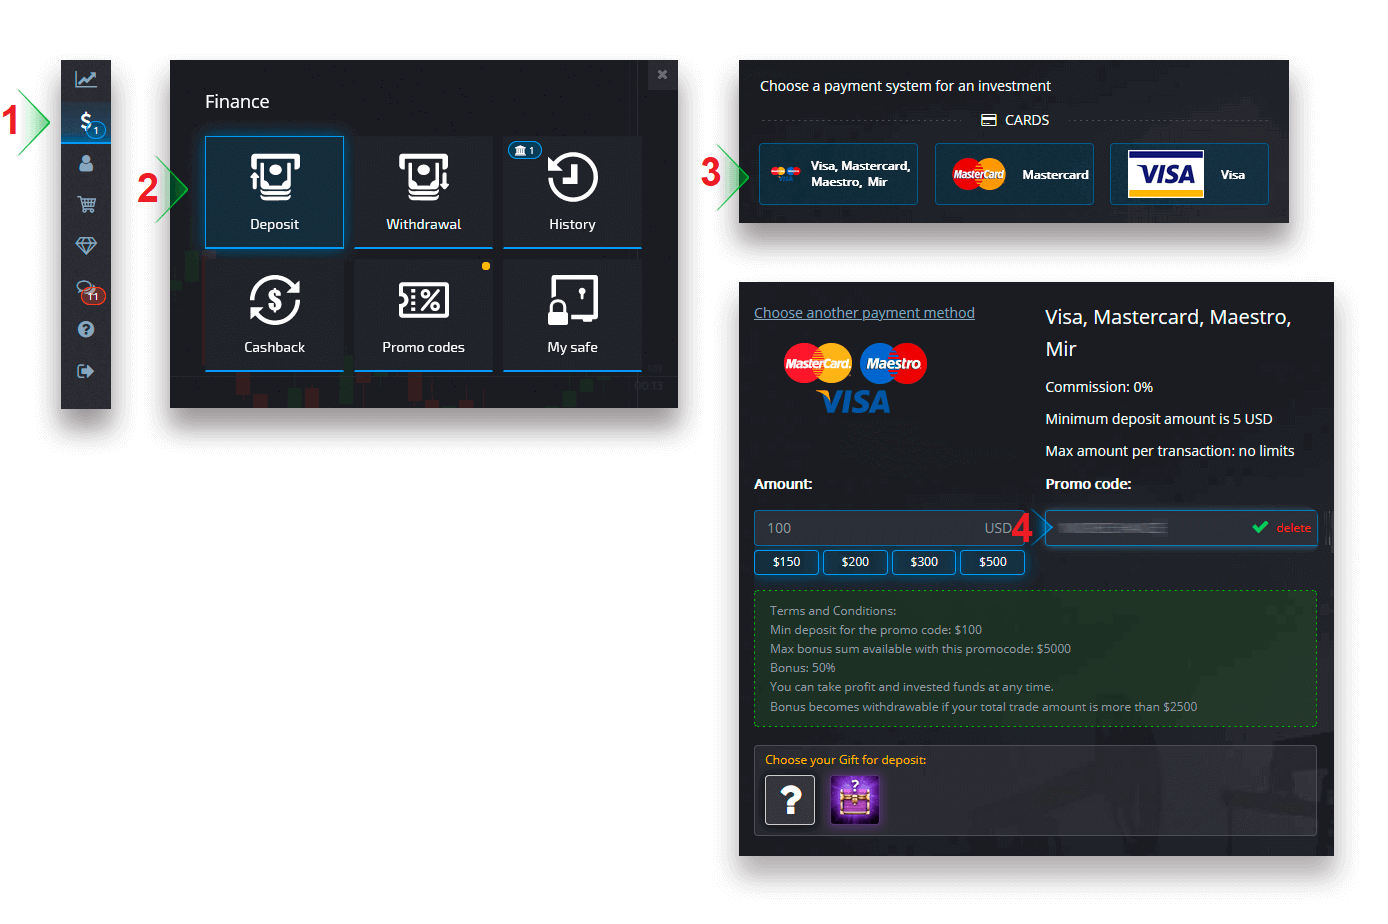
Complete your payment and the deposit bonus will be added to the deposit amount.
Choosing a chest with trading advantages
Depending on the deposit amount, you can choose a chest that will give you a random assortment of trading advantages.Choose a payment method first and on the next page, you will have a selection of available Chests options.
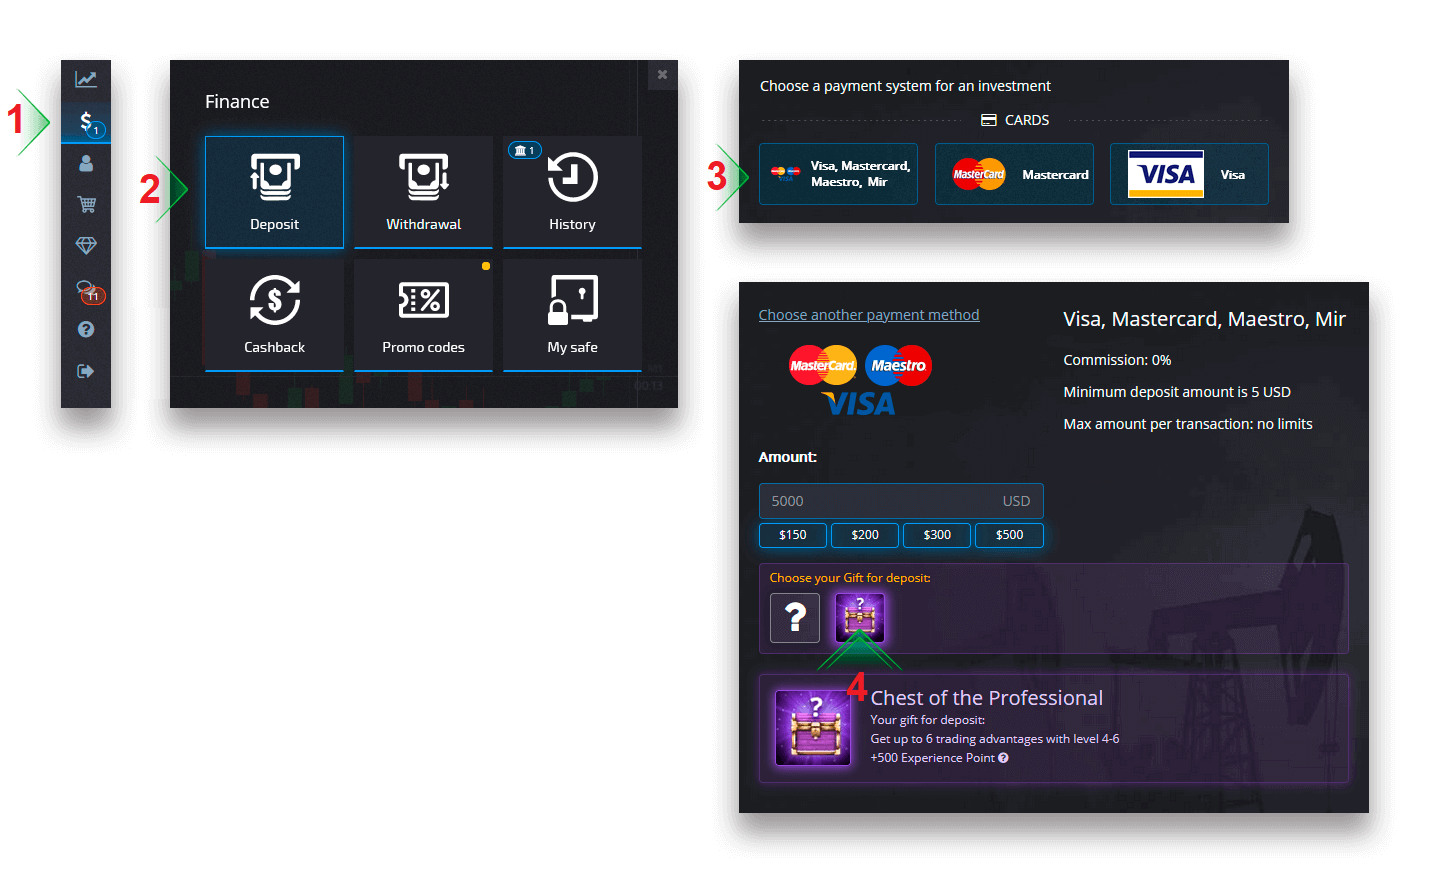
If the deposited amount is more or equal to the specified in the Chest requirements, you will receive a gift automatically. Chest conditions can be viewed by selecting a chest.
Deposit troubleshooting
If your deposit has not been processed right away, navigate to the appropriate section of our Support Service, submit a new support request and provide the information required in the form.
We will investigate your payment and complete it as soon as possible.
Trading
Placing a trading order
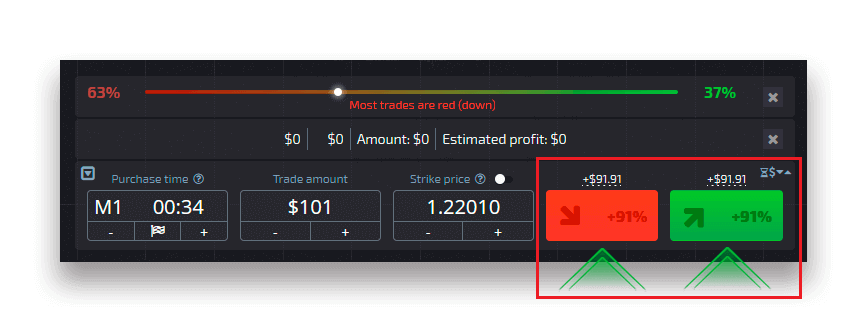
The trading panel allows you to adjust settings such as the purchase time and the trade amount. That’s where you place a trade trying to predict whether the price will go up (the green button) or down (the red button).Choose assets
You can choose among over a hundred assets available on the platform, such as currency pairs, cryptocurrencies, commodities, and stocks.
Choosing an asset by category
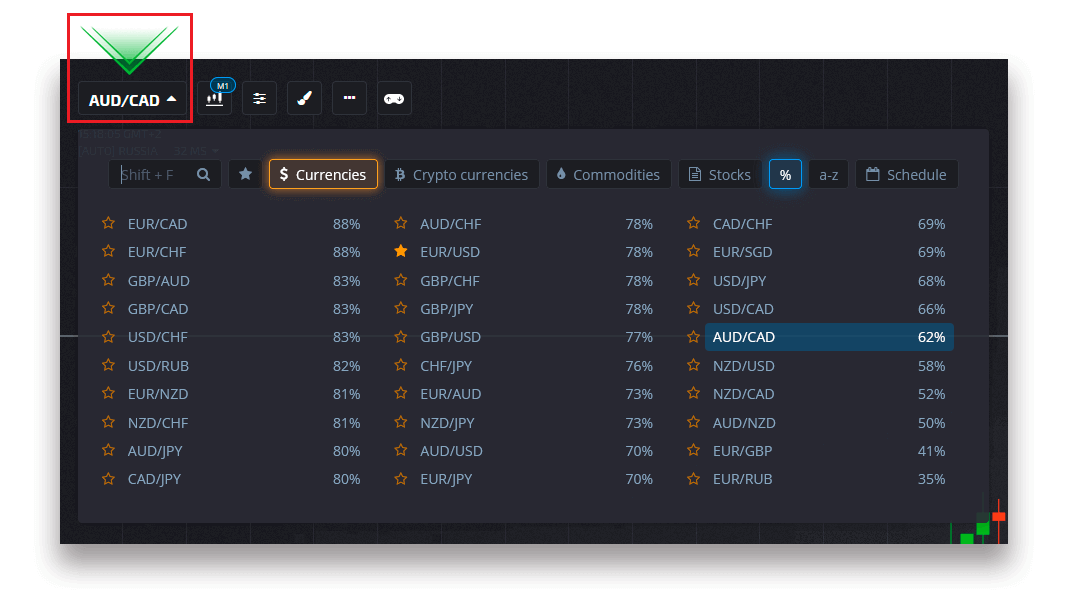
Or use an instant search to find a necessary asset: simply start typing in the asset name

You can favorite any currency pair/cryptocurrency/commodity and stock for quick access. Frequently used assets can be marked with stars and will appear in a quick access bar at the top of the screen.
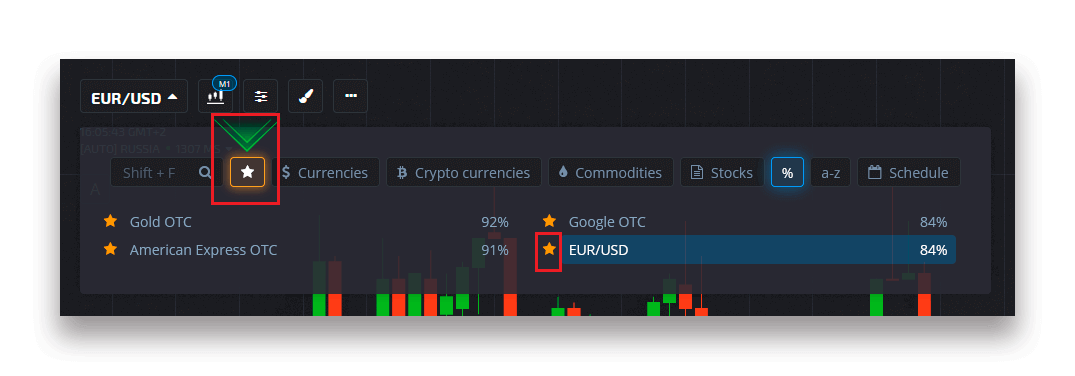
The percentage next to the asset determines its profitability. The higher the percentage – the higher your profit in case of success.
Example. If a $10 trade with a profitability of 80% closes with a positive outcome, $18 will be credited to your balance. $10 is your investment, and $8 is a profit.
Setting the Digital Trading purchase time
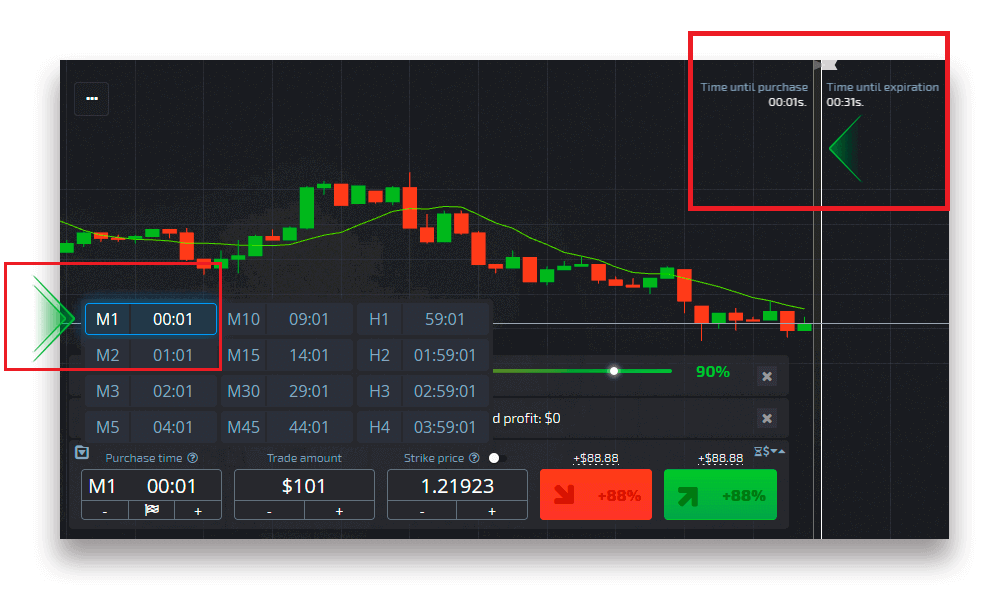
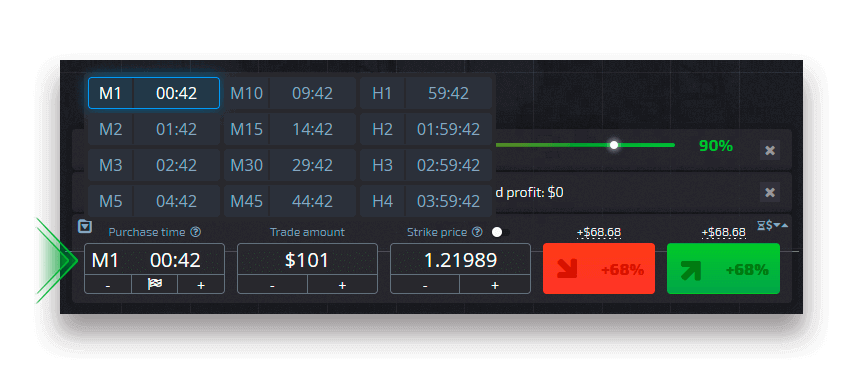
To choose the purchase time while in Digital Trading, click on the "Purchase time" menu (as in the example) on the trading panel and select the preferred option.
Please note that a trades expiration time in Digital trading is the purchase time + 30 seconds. You can always see when your trade will close on the chart — it’s a vertical line "Time until expiration" with a timer.
Setting the Quick Trading purchase time
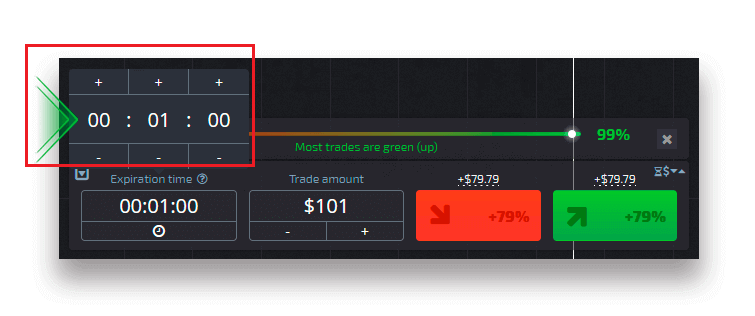
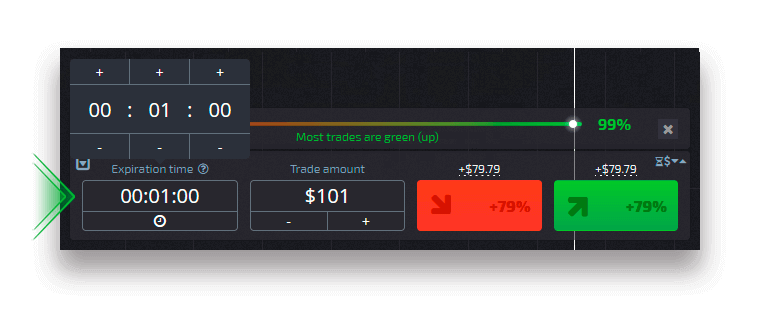
To choose the purchase time while in Digital Trading, click on the "Expiration time" menu (as in the example) on the trading panel and set the required time.
Changing the trade amount
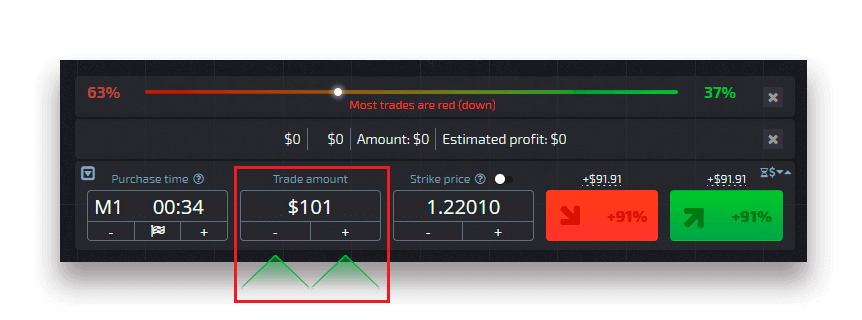
You can change the trade amount by clicking on "-" and "+" in the "Trade amount" section of the trading panel.
You can also click on the current amount which will allow you to type in the required amount manually, or multiply/divide it.
Strike price settings
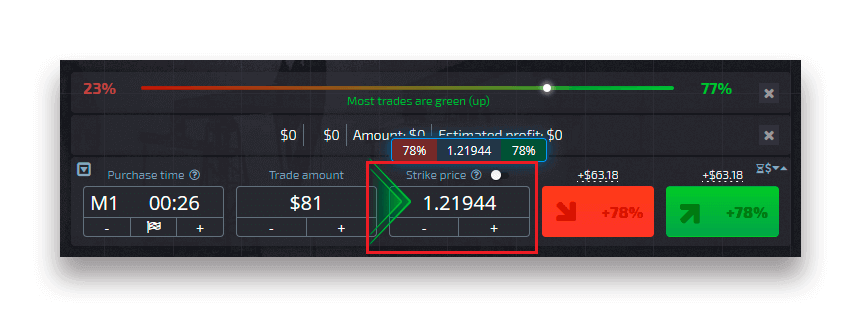
Strike price allows you to place a trade at a price that is higher or lower than the current market price with the respective change in the payout percentage. This option can be enabled at the trading panel before making a trade.
Risk and potential payout rates depend on how much the difference is between the market price and the strike price. This way, you not only predict the price movement but also indicate the price level that should be reached.
To enable or disable the strike price, use the corresponding switch in the lower trading panel above the market price.
Attention: When the strike price is enabled your trading orders will be placed above or below the current market place due to the nature of this feature. Please do not be confused with the regular trade orders which are always placed at the market prices.
Attention: Strike prices are only available for Digital Trading.
Analyze the price movement on the chart and make your forecast
Choose Up (Green) or Down (Red) options depending on your forecast. If you expect the price to go up, press "Up" and if you think the price to go down, press "Down"
Trade order results
Once a trader order is closed (time until expiration is reached), the result is marked accordingly as correct or incorrect.
In the event of the correct forecast
You receive a profit — the overall payout containing the originally invested amount as well as the trade profit which depends on the established parameters of the asset at the time of the order placement.
In the event of a correct forecast
The originally invested amount at the time of the order placement remains withheld from the trading account balance.
Cancelling an open trade
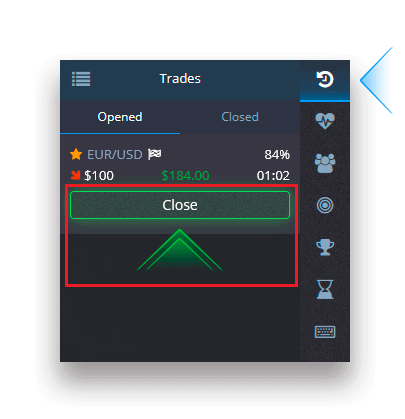
To cancel a trade before its expiration, go to the "Trades" section in the right panel of the trading interface. There you can see all trades that are currently in progress and you need to click on the "Close" button next to a specific trade.
Attention: The trade can be canceled only within the first few seconds once the trade order has been placed.
Placing an express trade
Express trade is a composite forecast based on several events across several trading assets. A won express trade grants a payout of more than 100%! When you activate the express trading mode, each click on the green or red button will add your forecast to the express trade. The payouts of all forecasts within an express trade are multiplied, thus making it possible to get a much higher profit compared to the use of a single Quick or Digital trade.To access Express trading, locate the "Express" button on the right-side panel of the trading interface.
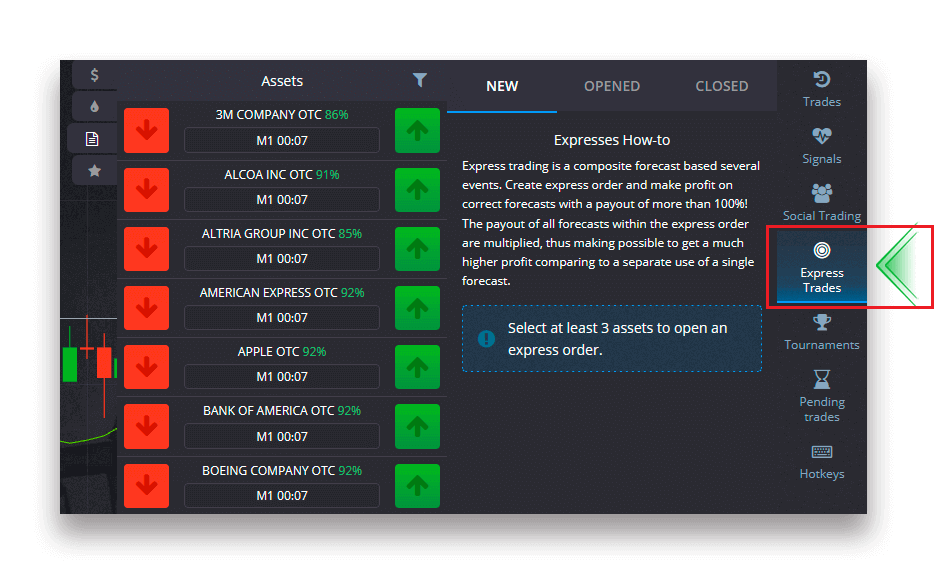
Choose an asset type by clicking on the appropriate tab (1) and then make at least two forecasts on various assets (2) to place an Express trade.
Viewing opened express orders
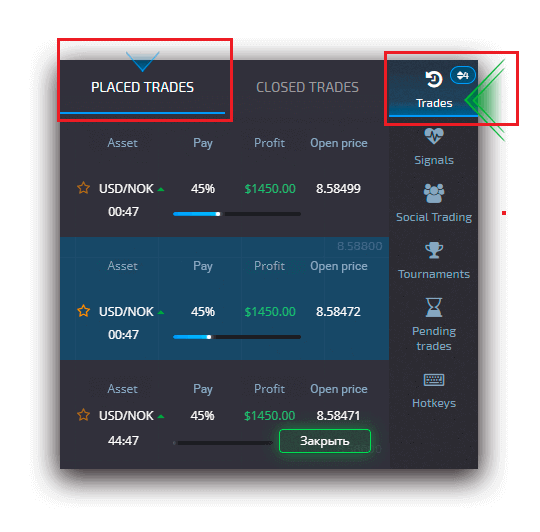
To see your active Express orders click on the "Express" button on the right-side panel of the trading interface and select the "Opened" tab.
Viewing closed express orders
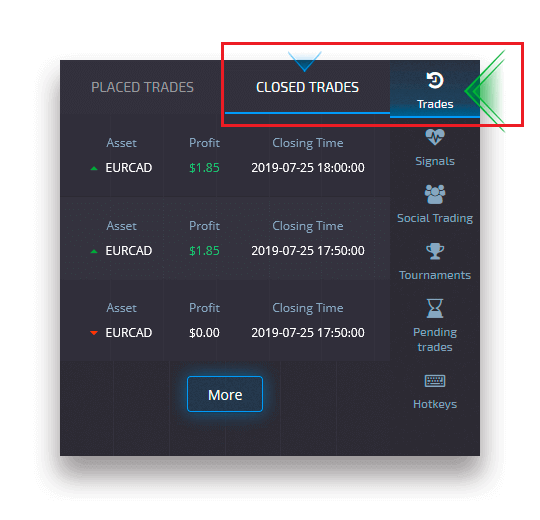
To see your closed Express orders click on the "Express" button on the right-side panel of the trading interface and select the "Closed" tab.
Monitoring your trades
Active trading sessions can be viewed without leaving the trading interface and without switching to another page. In the right menu, find the "Trades" button and click to display a pop-up menu with information on transactions for the current session.Open trades display
To see the open trades, go to the "Trades" section in the right panel of the trading interface. There will be displayed all trades that are currently in progress.
Closed trades display
Closed trades for the trading session can be found in the "Trades" section (the right panel of the trading interface).
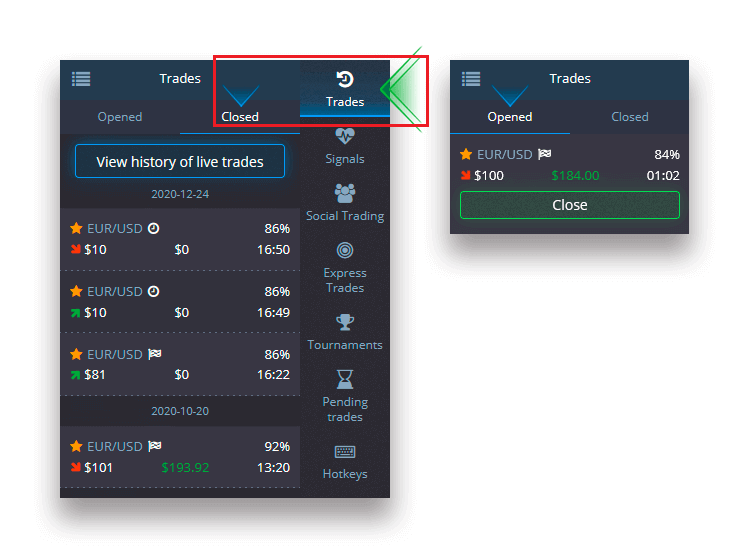
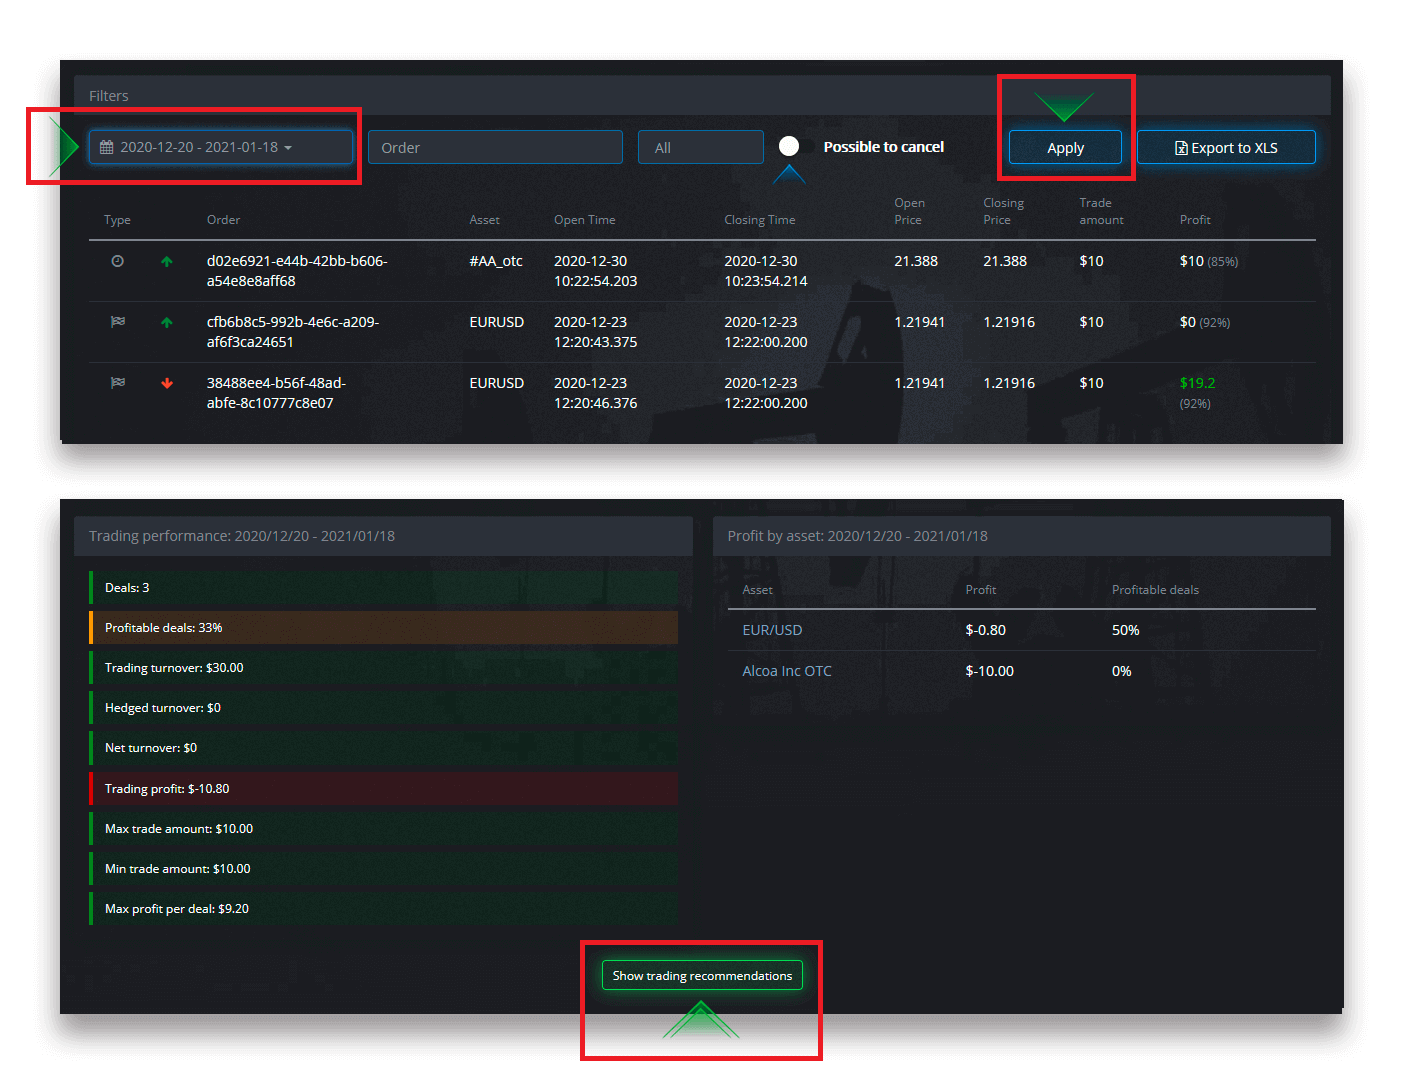
To view the history of live trades, click on the "More" button in this section and you will be redirected to your trading history.
Pending trades
Pending trade is a feature that allows you to place trades at a specified time in the future or when the asset price reaches a speсific level. In other words, your trade will be placed once the specified parameters are met. You can also close a pending trade before it is placed without any loss.Placing a "By the time" trade order
To place a pending order that is executed "By the time" (at a specified time), you have to:
- Select an asset.
- Click on the clock and set the date and time when you want the trade to be placed.
- Set the minimum payout percentage (Note that if the actual payout percentage will be lower than the one youve set, the order will not be opened).
- Choose the timeframe.
- Type in the trade amount.
- After you have set all the parameters, choose if you want to place a put or call option.
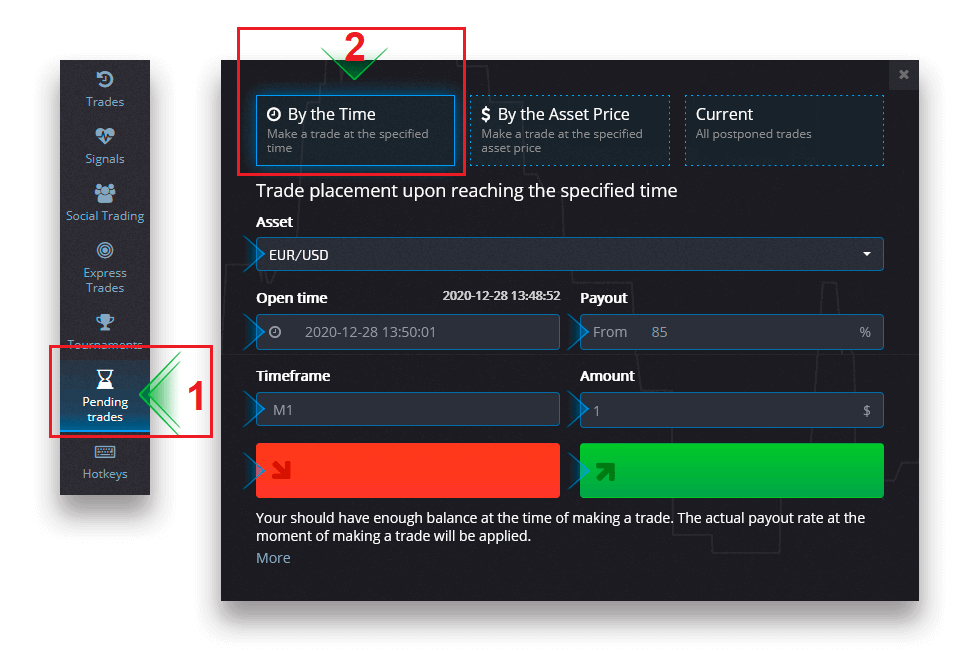
A pending trade will be created and you can track it in the "Current" tab.
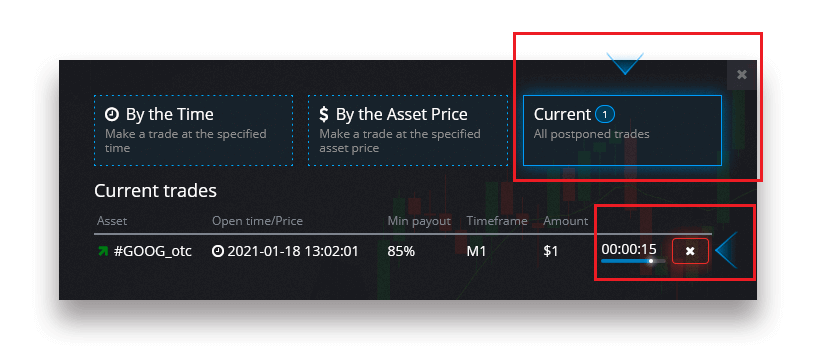
Please note that you should have enough balance at the time of the pending trade order execution, otherwise it will not be placed. If you want to cancel a pending trade, click "X" on the right.
Placing a "By the asset price" trade order
To place a pending trade that is executed "By the asset price", you have to:
- Select an asset.
- Set the required open price and payout percentage. If the actual payout percentage is lower than the one youve set, the pending bet will not be placed.
- Choose the timeframe and the trade amount.
- Choose if you want to place a put or a call option.
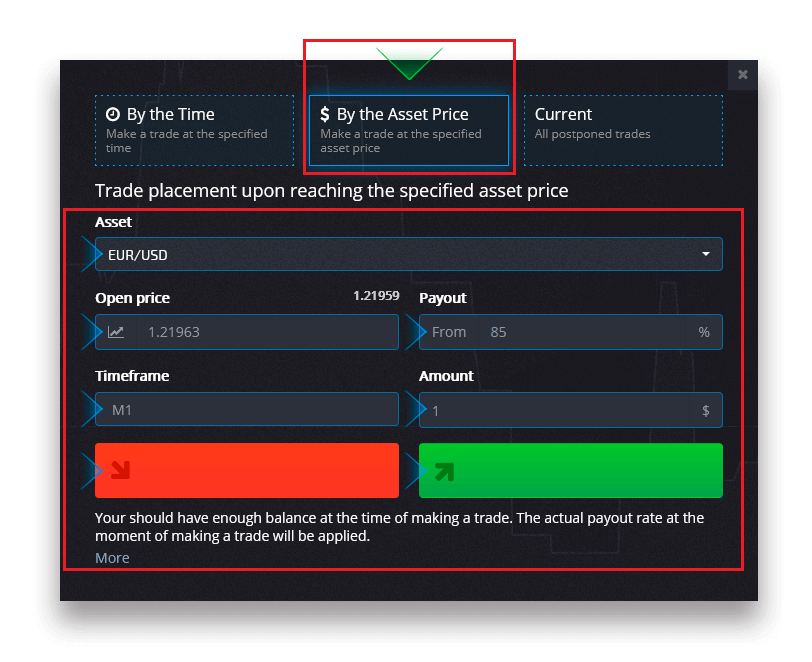
A pending trade will be created and you can track it in the "Current" tab.
Please note that you should have enough balance at the time of the pending trade order execution, otherwise it will not be placed. If you want to cancel a pending trade, click "X" on the right.
Attention: A pending trade executed "By the asset price" opens with the next tick after the specified price level is reached.
Cancelling a pending trade order
If you want to cancel a pending trade, click on the "X" button on the current pending orders tab.
Differences between Digital and Quick Trading
Digital Trading is the conventional type of trade order. Trader indicates one of the fixed timeframes for "time until purchase" (M1, M5, M30, H1, etc.) and places a trade within this timeframe. There is a half-minute "corridor" on the chart consisting of two vertical lines — "time until purchase" (depending on the specified timeframe) and "time until expiration" ("time until purchase" + 30 seconds).Thus, digital trading is always conducted with a fixed order closing time, which is exactly at the beginning of each minute.
Quick trading, on the other hand, makes it possible to set exact expiration time and allows you to utilize short timeframes, starting from 30 seconds before expiration.
When placing a trade order in quick trading mode, you will see only one vertical line on the chart — "expiration time" of the trade order, which directly depends on the specified timeframe in the trading panel. In other words, it is a simpler and faster trading mode.
Switching between Digital and Quick Trading
You can always switch between these types of trading by clicking on the "Trading" button on the left control panel, or by clicking on the flag or clock symbol underneath the timeframe menu on the trading panel.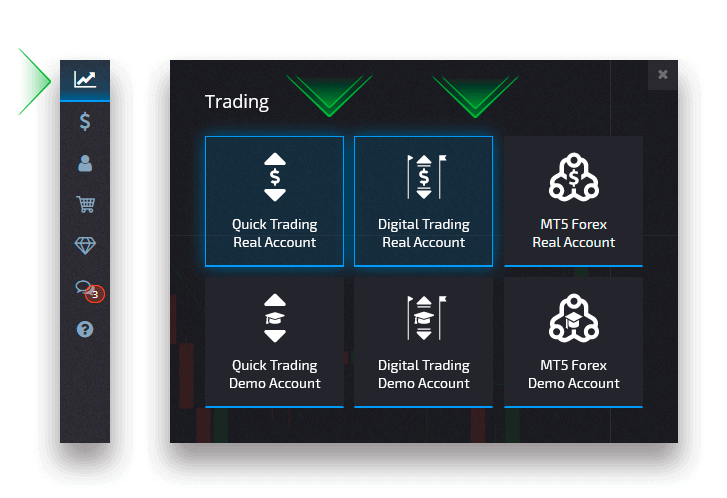
Switching between Digital and Quick Trading by clicking on the "Trading" button

Switching between Digital and Quick Trading by clicking on the flag
Social trading
Social trading is one of the unique features of our platform. This section allows you to monitor progress, view ratings, and also copy trade orders of the most successful traders in the automatic mode.
Copying a trader
If you have enabled Social trading, all traders that you copy will be displayed in this section. If your list of copied traders is empty, you can click "View top-ranked traders" and find a trader to copy or watch.To adjust copy settings, select a trader in Social trading, and in the next window click "Copy trades".
In the "Copy settings" window you can adjust the following parameters:
Copy in proportion
The "Copy in proportion" setting allows you to adjust the percentage of trade amount in relation to the original trades. For example, if you set this parameter to 60% when you copy a $100 trade, your trade will open at $60.
Meanwhile, the payout percentage will be the same as for the original trade.
Stop balance
The "Stop balance" setting allows you to set the balance amount at which the copying will be terminated. You can also stop copying at any time manually.
Min copy trade amount
The "Minimum copy trade amount" setting allows you to set the minimum amount for any copied trade.
Please note that the minimum copy trade amount cannot be less than $1.
Max copy trade amount
The "Maximum copy trade amount" setting allows you to set the maximum amount for any copied trade.
To save all changes in the copy settings, click on the "Confirm" button.
Attention:Please note that you can only copy the original trades of the selected trader. It’s not possible to copy a copied trade.
Attention: Please note that trades with an expiration time of less than 1 min will not be copied.
Copying trades of other users from the chart
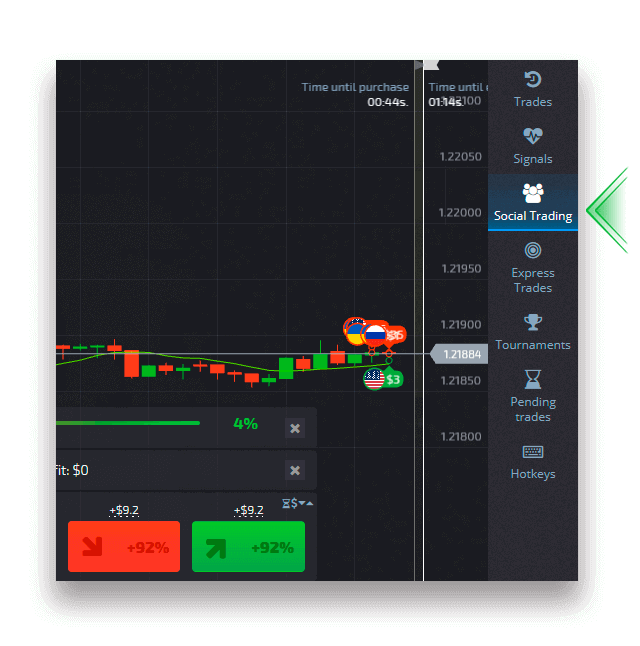
When trades of other users are displayed, you can copy them right from the chart within 10 seconds after they have appeared. The trade will be copied in the same amount provided that you have enough funds on your trading account balance.Click on the most recent trade that you are interested in and copy it from the chart.
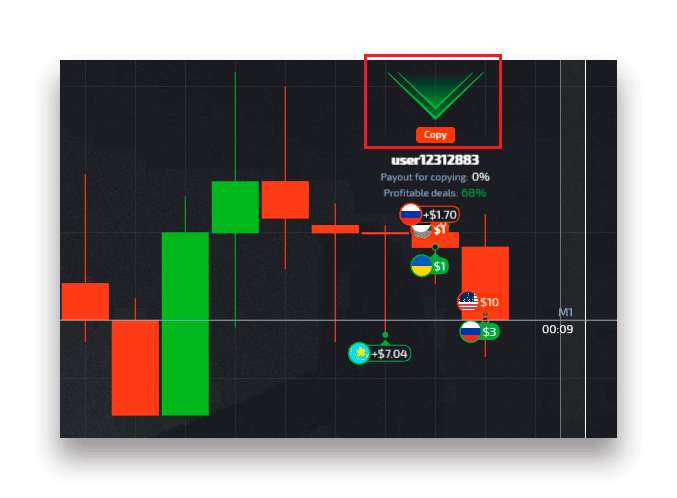
Displaying trades of other users
You can view the trades of other users on the platform right on the chart in real time. To switch other users trades on and off, click on the three dots in the upper left corner and select the "Social trading" button.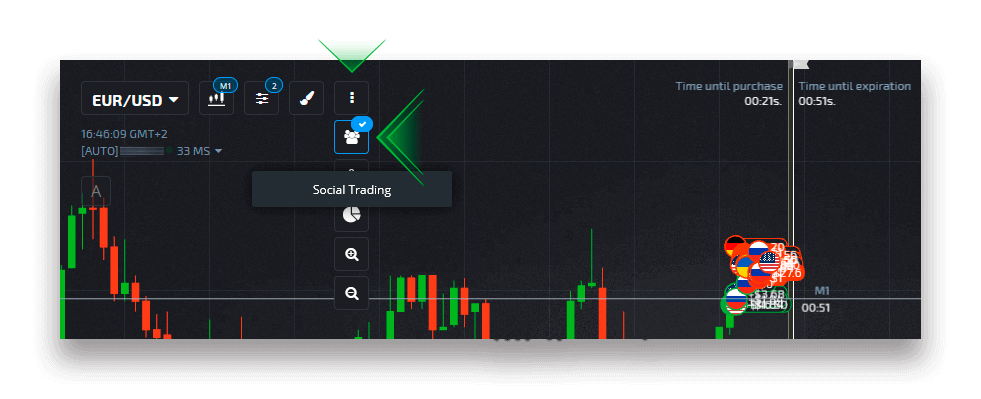
Withdrawal
Creating a withdrawal request
Navigate to the "Finance" "Withdrawal" page.
Enter the withdrawal amount, choose an available payment method, and follow the onscreen instructions to complete your request. Please note that the minimum withdrawal amount may vary depending on the withdrawal method.
Specify the receiver account credentials in the "Account Number" field.
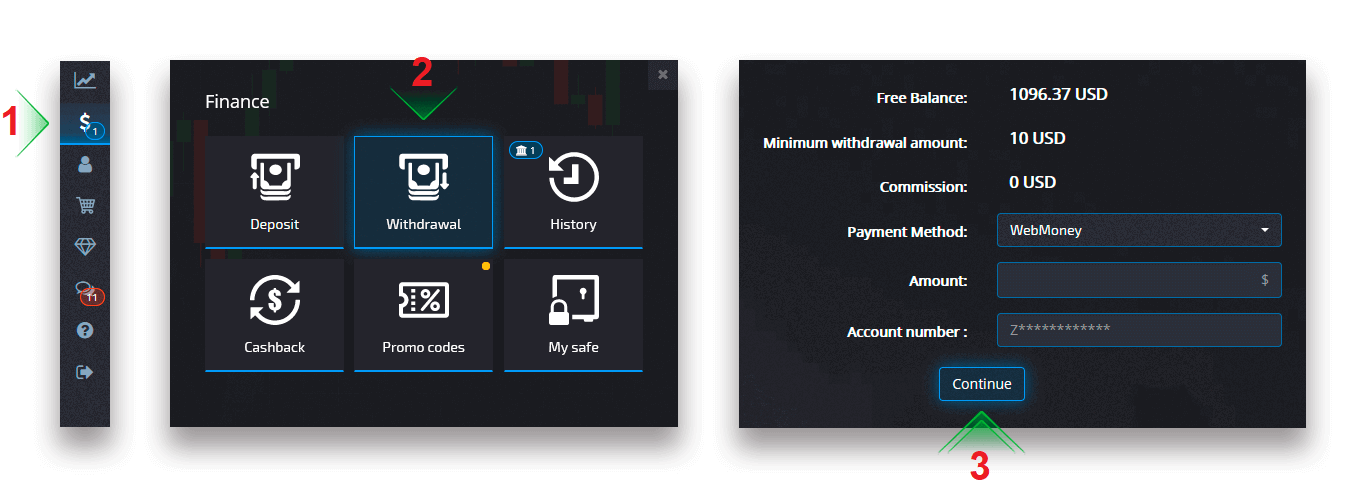
Attention: if you create a withdrawal request while having an active bonus, it will be deducted from your account balance.
Cryptocurrency withdrawal
On the Finance - Withdrawal page, choose an cryptocurrency option from the “payment method” box to proceed with your payment and follow the onscreen instructions.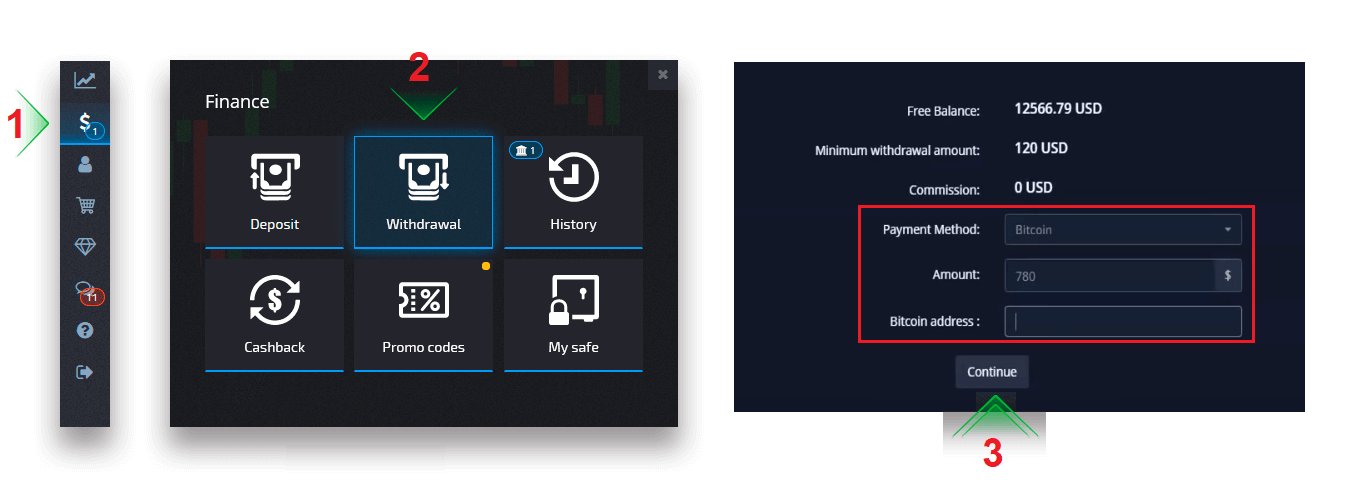 Choose a payment method, enter the amount and Bitcoin address you want to withdraw.
After clicking Continue, you will see the notification that your request has been queued.
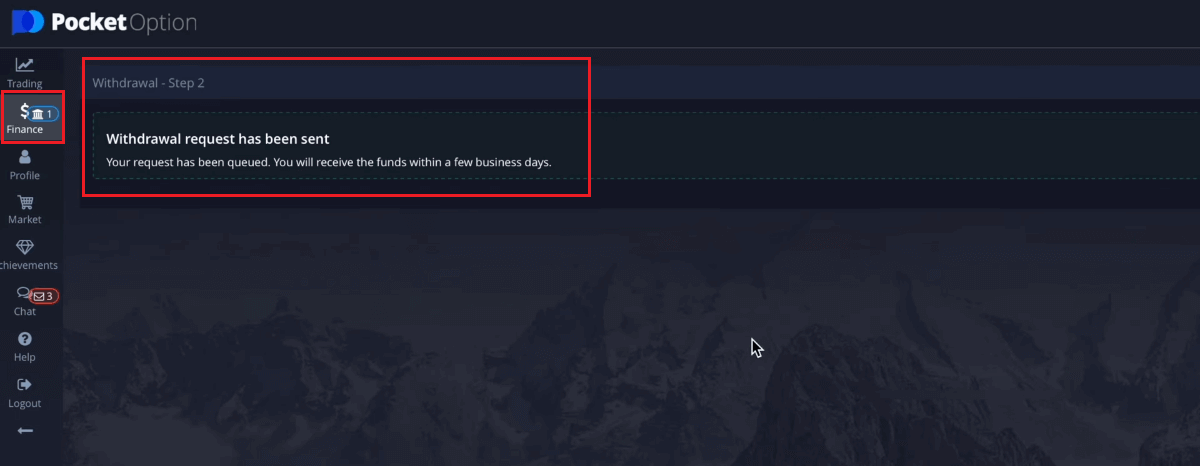
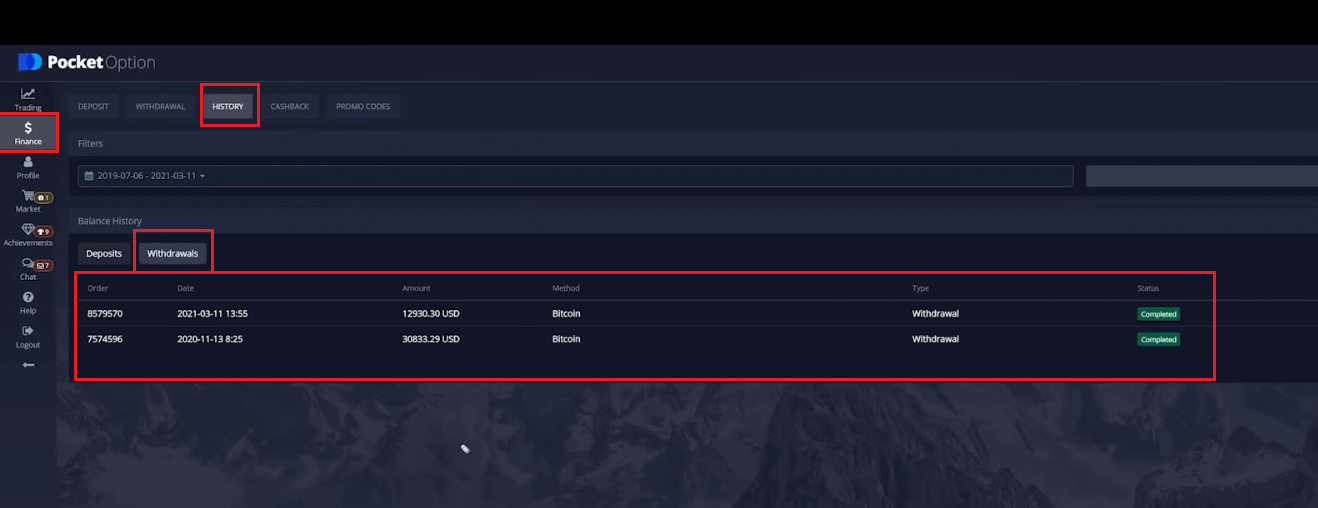
You can go to History to check your latest withdrawals
Visa/Mastercard withdrawal
On the Finance - Withdrawal page, choose a Visa/Mastercard option from the “Payment Method” box to proceed with your request and follow the onscreen instructions.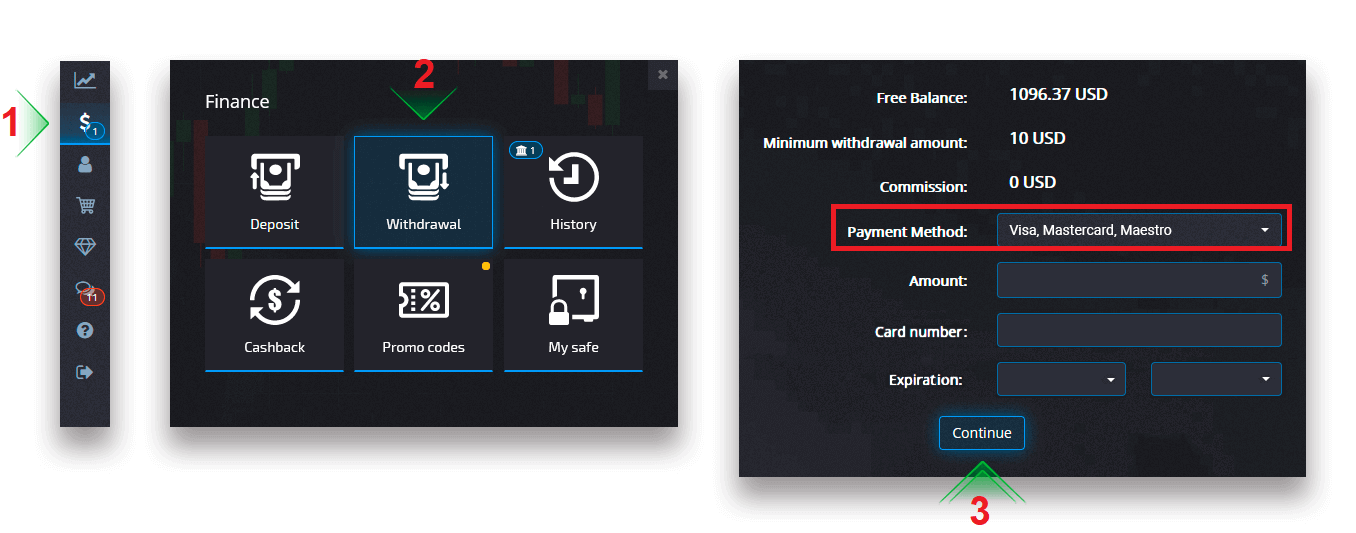
Please note: in certain regions the bank card verification is required prior to using this withdrawal method. See the bank card verification how-to.
Choose a card, enter the amount, and create the withdrawal request. Please note that in certain cases it may take up to 3-7 business days for the bank to process a card payment.
eWallet withdrawal
On the Finance - Withdrawal page, choose an eWallet option from the “Payment Method” box to proceed with your request and follow the onscreen instructions.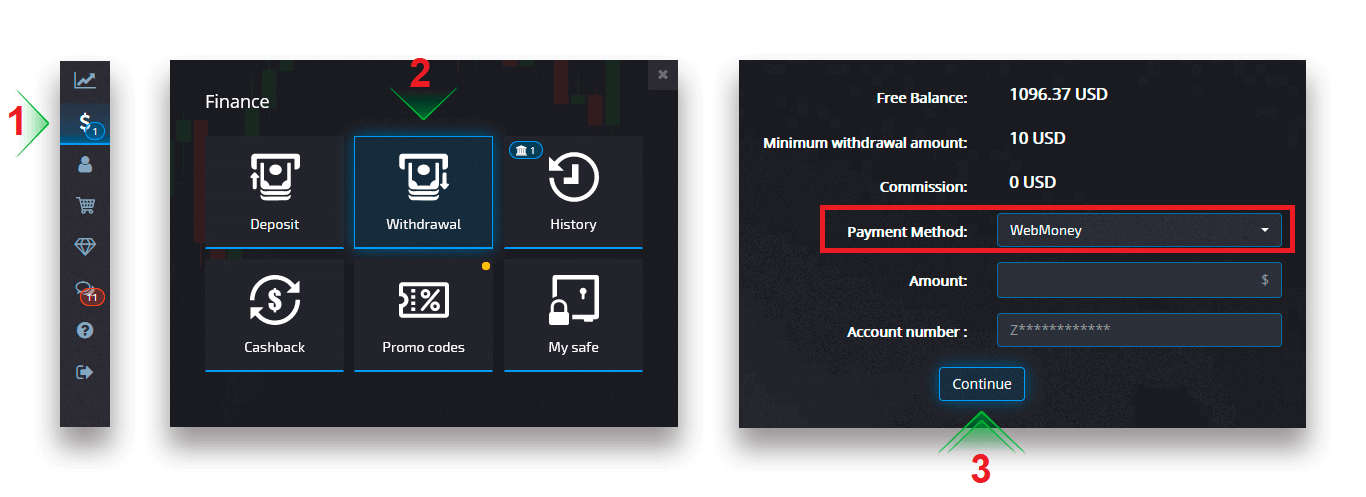
Choose a payment method, enter the amount, and create the withdrawal request.
Wire transfer withdrawal
On the Finance - Withdrawal page, choose a wire transfer option from the “payment method” box to proceed with your request and follow the onscreen instructions. Please contact your local bank office for the bank details.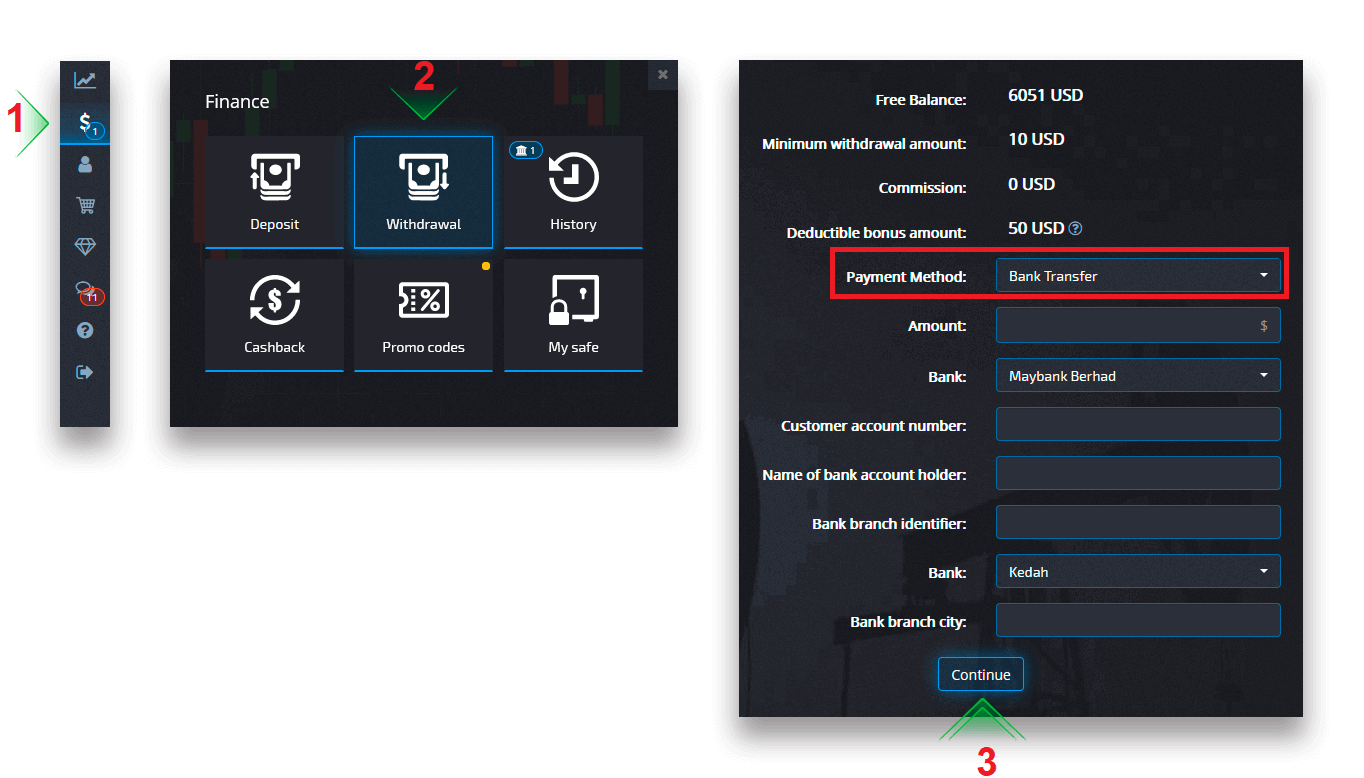
Choose a payment method, enter the amount, and place your withdrawal request.
Withdrawal processing currency, time and applicable fees
Trading accounts on our platform are currently available only in USD. However, you can withdraw funds to your account in any currency, depending on the payment method. Most likely the funds will be converted to your account’s currency instantly upon receiving payment. We do not charge any withdrawal or currency conversion fees. However, the payment system that you use may apply certain fees. Withdrawal requests are processed within 1-3 business days. However, in some cases, the withdrawal time can be increased up to 14 business days and you will be notified about it at the support desk.
Cancelling a withdrawal request
You can cancel a withdrawal request before the status is changed to “Complete”. To do so, open the Finance History page and switch to the “Withdrawals” view.
Find the pending withdrawal and click on the Cancel button to dismiss the withdrawal request and retrieve funds on your balance.
Changing the payment account details
Please note that you can withdraw funds via the methods that you previously used for depositing into your trading account. If there is a situation when you can no longer receive funds to the previously used payment account details, feel free to contact the Support desk in order to approve new withdrawal credentials.
Withdrawal troubleshooting
If you have made a mistake or entered incorrect information, you can cancel the withdrawal request and place a new one afterward. See the Cancelling a withdrawal request section.In accordance with the AML and KYC policies, withdrawals are available only to fully verified customers. If your withdrawal was cancelled by a Manager, there will be a new support request where you will be able to find the reason for the cancellation.
In certain situations when the payment can not be sent to the chosen payment, a financial specialist will request an alternative withdrawal method via the support desk.
If you did not receive a payment to the specified account within a few business days, contact the Support desk to clarify the status of your transfer.

Adding a new card for withdrawals
Upon completing the requested card verification, you can add new cards to your account. To add a new card, simply navigate to Help - Support Service and create a new support request in the appropriate section.
Conclusion: Your Pocket Option Questions Answered
This FAQ guide aims to address the most common queries about Pocket Option, ensuring a smooth experience for traders. From account setup and safety measures to deposits and withdrawals, Pocket Option provides comprehensive support to meet user needs. If you have further questions, don’t hesitate to explore the Help Center or contact customer support for assistance.
Start trading confidently with Pocket Option—your gateway to financial success!


